Saving Kerio Connect Email into an External Drive provides multiple benefits. Below are some reasons and benefits you can avail yourself by backing up your Kerio Connect mailboxes.
Accessing your Kerio emails is effortless, with a backup copy ensuring availability regardless of location or time.
Keep yourself shielded from unexpected events by frequently backing up your Kerio emails and organizing your inbox to prevent unwanted scenarios. Even amidst a hacking incident, your data will stay shielded within the external drive, ensuring its security.
Enhance your efficiency by consolidating the backup of several Kerio user mailboxes into a single, streamlined process, saving time and effort.
Managing the risk of data loss stemming from diverse causes, spanning accidental deletions and the looming threat of unauthorized entry into sensitive information.
Local storage ensures data accessibility even offline, providing continuity irrespective of network availability.
If you export Kerio email to PST, you can open and access all your emails in any Outlook account by adding PST.
In today’s digital landscape, there is a surge of interest among individuals seeking a solution to transfer their Kerio Connects mailboxes into their External Drives. If you are among them, stick with this blog to uncover the step-by-step process from start to finish.
Can you manually back up the Kerio mail?
Although there is a manual method available, it is not particularly practical. I’ll outline the steps in the following section. Below, you will find the instructions for manual Kerio email backup.
Log into your Kerio account >> go to Configuration >> proceed to Archiving & Backup >> select the Backup option within the admin settings.
Select the checkbox next to the option to enable message storage and configuration recovery backup.
Tap to input details for the backup.
Choose when and how to export, and then press OK to proceed.
Go to the advanced options, specify the highest allowable size and the number of backups, and press OK to proceed.
Determine the destination folder within the Target Backup Directory to store your Kerio mail backup.
If you need to authenticate on the network drive, choose Specify and type in your login credentials.
Enter your email address into the Notification section to ensure you receive timely updates regarding backups.
Click Apply and proceed by activating the Start Now option.
Read It Before Using Manual Way- During the endeavor to implement manual backup procedures for the Kerio Connect mail server, numerous users encountered perplexity and became entangled in the process. Their attempts proved futile, stalling any progress they hoped to make. Moreover, you will not get any advanced option to customize your results as per your requirements. If you are not technically sound, then don’t try manual backup as it can risk your data.
If you seek to safeguard your data while transitioning to a desired file format, consider employing Shoviv IMAP Backup Email Software for a secure backup process.
Some Prominent Features of the Shoviv IMAP Backup and Restore Tool
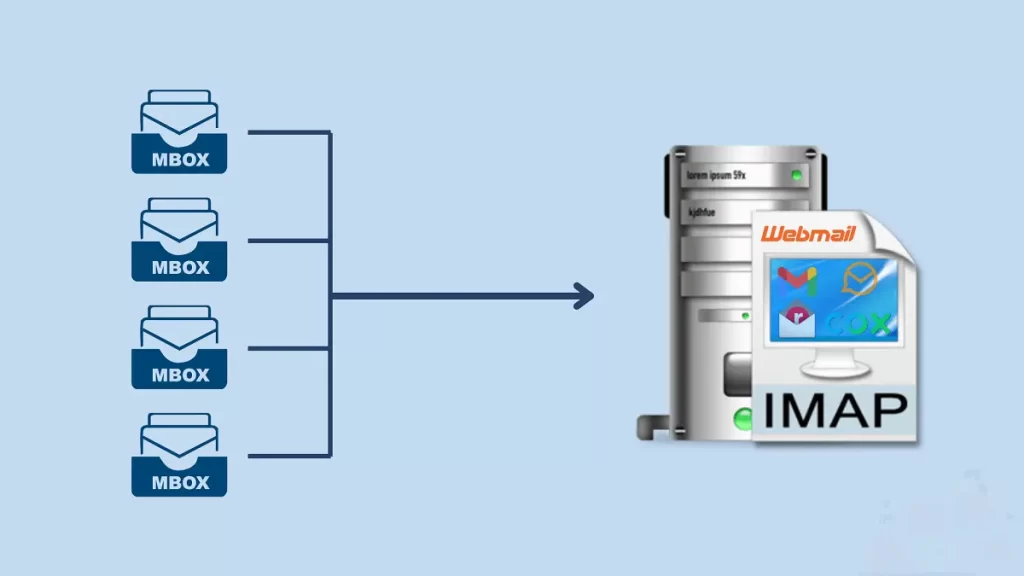
This tool harmonizes effortlessly with diverse email clients, including Kerio Mail, Gmail, SquirrelMail, Yandex Mail, Yahoo! Mail, and any IMAP-using email service.
It works on job-driven processing, it enables users to generate and execute a multitude of tasks concurrently.
This software can help all Windows Operating System users to download their emails in the desired format.
Kerio email backup can be taken into PST, MBOX, EML, HTML, MHT, and MSG.
With the help of advanced filter settings, users can selectively back up Kerio Connect mailbox items.
Moreover, users can schedule the backup process as per the requirement.
As its name specifies; this utility can also import/restore data into the mailbox from the files.
This application boasts reliability and trustworthiness, crafted by a seasoned team of professional, well-versed backup solutions.
Shoviv IMAP Backup and Restore tool is the most secure and trusted email backup application suggested by many adepts. This software can help you overcome all the manual method’s drawbacks easily. Follow these steps to backup emails from Kerio Connects:
Mastering the Technique of Archiving Kerio Emails to Your External Device
Start with installing the Shoviv IMAP Backup and Restore AKA Kerio Mail Backup Tool application, then open it.
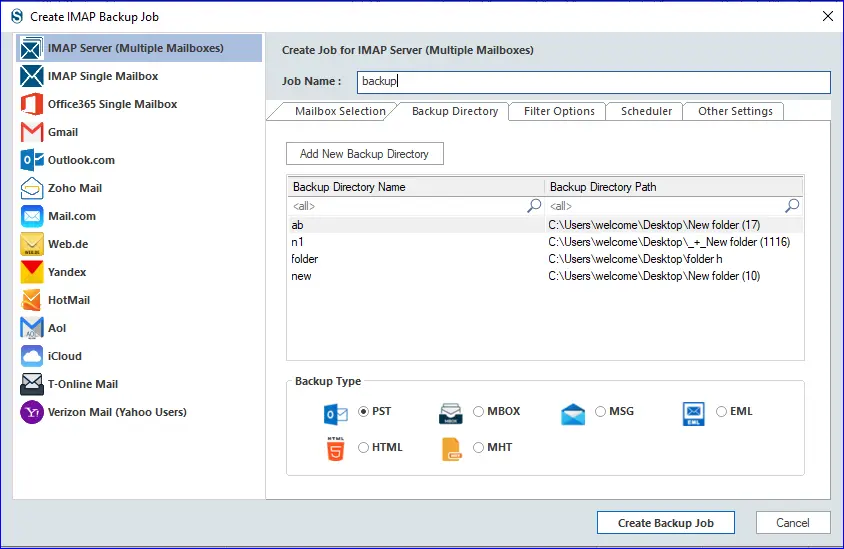
Select the Backup Job option. A pop-up window will open where you can enter the Job Name.
Choose the Add Mailbox option, input your login information to fetch the mailboxes, and proceed to click on the Backup Directory tab.
Determine the location for saving your backup file by selecting the appropriate directory. Then, use the dashboard to choose your preferred file format. Here, we will choose Kerio emails as we want to export Kerio emails to PST.
Head to the filter setting and select the criteria to omit unnecessary emails from the backup procedure.
Open the Scheduler tab and arrange the backup procedure as per the needed schedule.
Finally, please navigate to the additional settings tab and adjust them to your preferences. When everything is set, press the Create Backup Job button to proceed.
Following the above process, you can successfully back up Kerio emails into external drives.
Emails have now become a crucial part of communication at the personal and professional levels. Each user should have a backup solution to save or download their Webmail emails (Gmail, Outlook.com, HostGator, Blue Host, etc. This guide will share the complete stepwise instructions for the Webmail backup and restore process. Here, users will learn the simple and easy-to-follow solutions to restore and backup Webmail email data.
Users will get manual and professional ways to download Webmail emails to the hard drive or local folder. So, let us discuss the reasons for and methods of exporting Webmail emails without taking any ado.
Table of Content
Why backing up Webmail emails is necessary?
To simplify the Webmail backup task, users must understand the benefits of saving Webmail emails locally. Learn the reasons in the points below and then know the solutions to download/back up Webmail emails.
Webmail data security: If users have a backup, they can easily avoid disrupting situations, like accidental data loss, restore data if someone hacked their account, etc.
Clearing old emails: Sometimes, users need to free up space in the Webmail. In that case, users can back up old emails and delete them later to free up space.
Archive important emails: By backing up the Webmail emails, users can archive the essential emails for future reference. Users can easily use the archive if they need it later.
Let us now explore the backup and restore process of the Webmail emails.
Trusted ways to back up emails in Webmail
Users can go through several methods to back up Webmail, such as Outlook.com, HostGator, Blue Host, etc., to the local folder. We will know each solution in detail to back up or restore Webmail emails.
To backup emails from specific Webmail (Outlook.com, Gmail and Yahoo):
1. Export Outlook.com or Outlook web emails
2. Back up Gmail emails
3. Download/Export Yahoo emails
We will use the Outlook and Thunderbird desktop applications to back up other webmail emails on the local drive.
Method 1: Back up Webmail emails using the Outlook desktop software
If your Webmail doesn’t offer a direct way to download Webmail emails for backup, you can use the Outlook email client to back up your Webmail emails. This process will help users export Webmail emails to PST format; see the steps below.
Open the Outlook program and configure your Webmail account using IMAP. (HostGator, Blue Host, etc.).
Then, navigate to the File tab, Account Settings and click the Account Settings option.
Now, select your configured Webmail email account and tap the Change button.
Ensure that the account is configured with IMAP and click the Next button. Wait till Outlook syncs all your Webmail data.
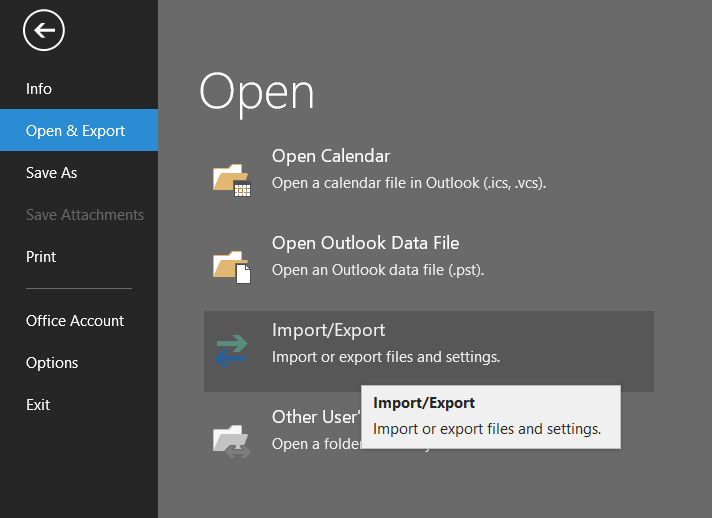
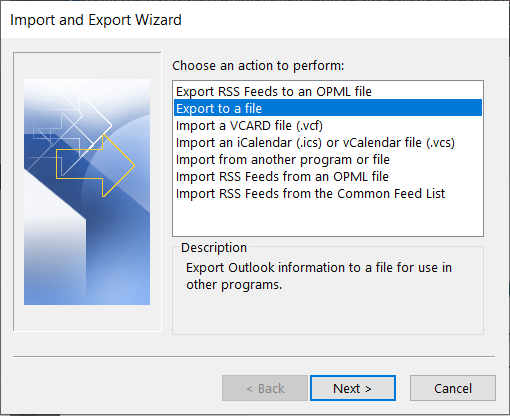
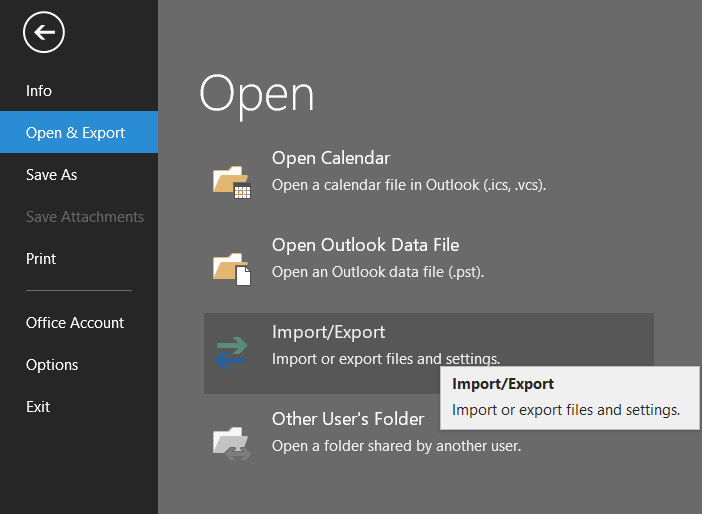
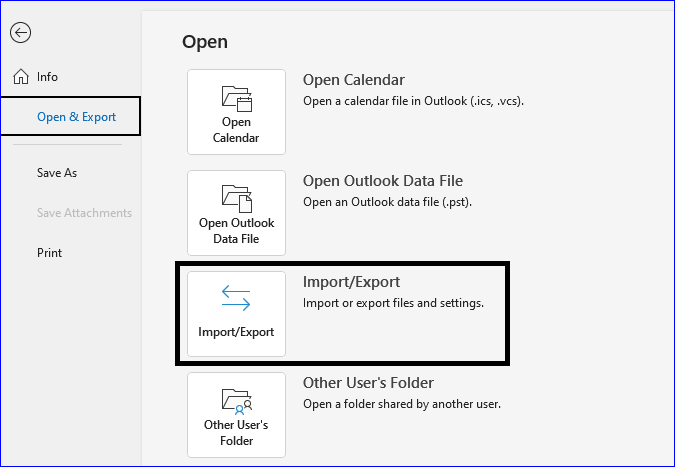
After that, move to the File section, choose Open & Export and click the Import/Export option.
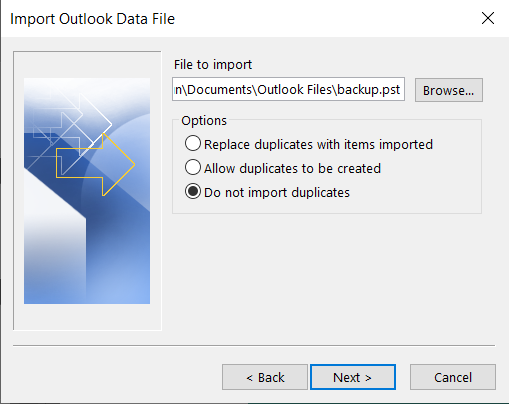
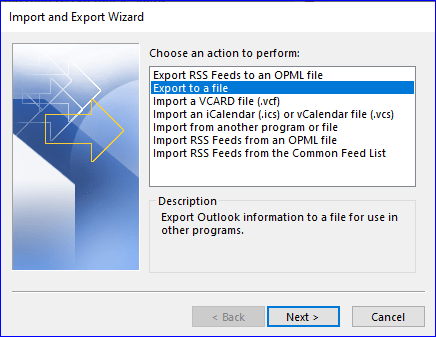
Select the Export to a file option and click the Next button.
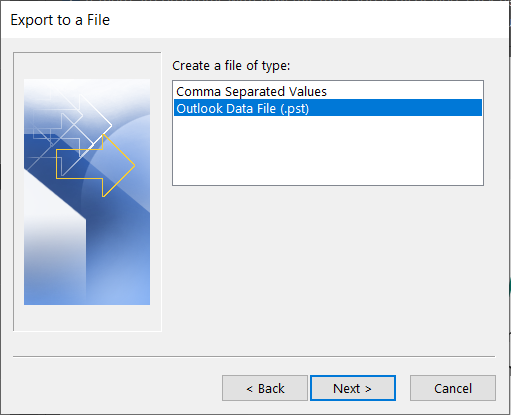
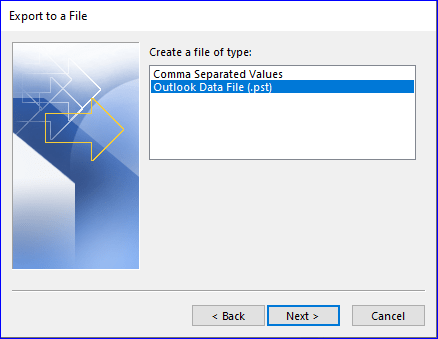
Thereafter, choose the Outlook data file (.pst) and continue with the Next.
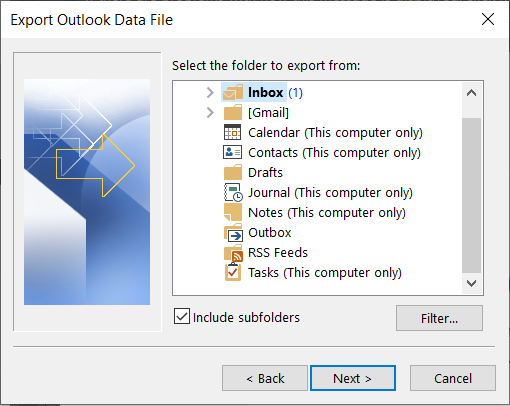
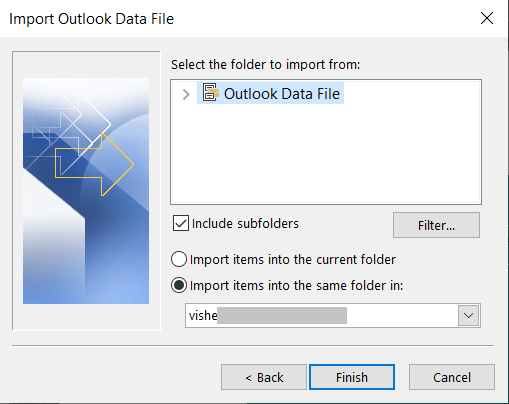
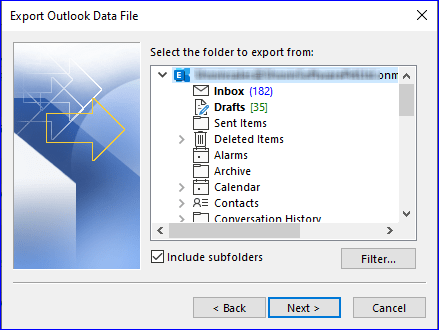
Pick the folders and subfolders to backup, and click the Next button.
Then, tap the Browse to select the location where you want to save resultant PST and click the Finish button.
Now, the Outlook program will start exporting your Webmail emails to PST format. Once the backup is done, navigate to the PST file location and verify the PST file containing all emails.
Method 2: Use the Thunderbird desktop application for Webmail email backup
Download and install the Mozilla Thunderbird client to download Webmail emails. This method will back up webmail emails in MBOX format.
Launch the Mozilla Thunderbird app on your device and set up your Webmail account using IMAP.
After setting up your Webmail account, the app will sync all your emails.
Once synced, navigate to the Tools section, select the Export Profile and choose to export the entire profile or only mail. Then, click the OK button.
Thereafter, the Thunderbird app will create a backup of your Webmail emails. You can save the backup file to the desired location on their local storage.
These two ways can be used to back up Webmail emails to the local folder. Now, we will know how to restore Webmail emails to the external drive.
Solutions to restore Webmail emails using Outlook & Thunderbird
For users who are using email clients, the option to restore emails directly to the Webmail account, like Gmail, Outlook, etc., from the MBOX and PST file formats.
Moreover, if your Webmail doesn’t provide a way to restore Webmail emails, you can use the Outlook & Thunderbird programs to do so.
Solution 1: Restore Webmail emails using the Microsoft Outlook
If you have the Webmail email data in PST format, you can quickly restore Webmail emails. Make sure you have configured your Webmail account on Outlook, and then follow the below steps.
Start your Microsoft Outlook application.
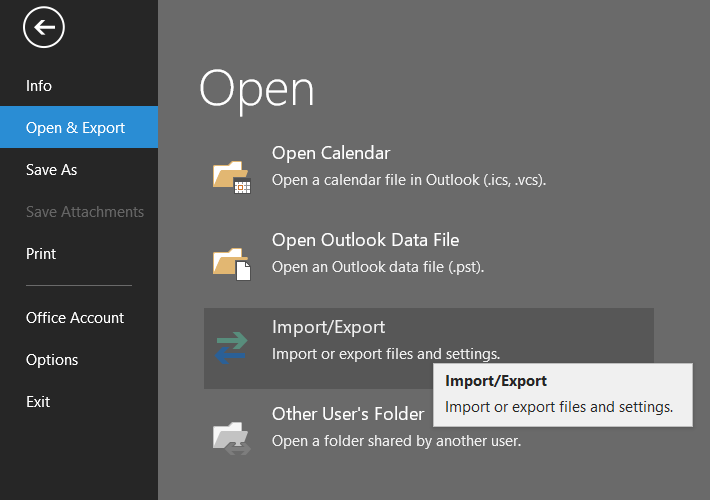
Then, arrive at the File tab, select the Open & Export and tap the Import/Export option.
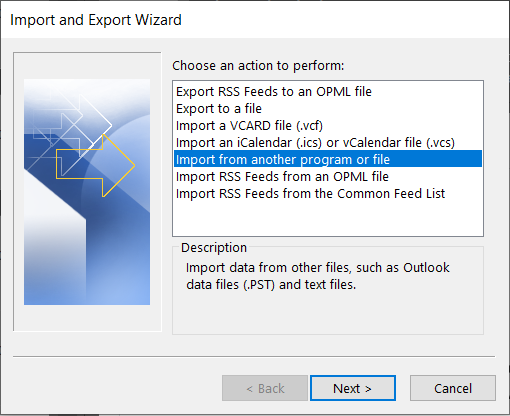
After that, choose the Import from another program or file option and hit the Next button.
Now, select the Outlook data file (.pst) option.
Next, browse the backup file location and click the Import button.
Finally, your emails will be restored to the Webmail account.
By performing these steps, you can effectively restore Webmail emails from PST file format using the Outlook program.
Solution 2: Mozilla Thunderbird to restore Webmail emails
If you have Webmail emails backed up in MBOX format, you can use the Thunderbird app to restore them. The steps are as follows:
Open the Thunderbird software to proceed with the Webmail email restore task.
After that, move to the Tools and select the Import Profile option.
Then, tap the Browse and choose the backup file (MBOX). Give a name to the profile and click the Next button.
Once done, the app will start restoring emails to the Webmail account if you have configured it on the Thunderbird using IMAP.
We hope you now understand the process for Webmail email backup and restore tasks. However, these manual tricks can take too much time and affect the Webmail data. Fortunately, users can also try the Shoviv IMAP Backup and Restore Tool to back up or restore Webmail emails.
One Stop Way to Back up & Restore Webmail emails:
Shoviv IMAP Backup and Restore Tool is a professional way to back up and even restore Webmail emails effortlessly. It works without any restrictions on the size and number of emails. This software allows users to back up Webmail emails in various file formats, including PST, MSG, MBOX, and EML. Along with that, users can also restore their Webmail emails from several file formats, like PST, OST, MSG, MBOX, etc.
It allows users to use the date range and folder filters to select the only items they want to back up. Users can also create and run multiple backup or restore projects in parallel for a quick backup of Webmail emails. It also supports all IMAP-using email clients, including Gmail, Outlook, Thunderbird, Blue Host, HostGator, etc.
This tool offers the facility to avoid duplicate items in the target Webmail account.
In addition, users can set the resultant PST file size to prevent oversized PST file issues.
Backup and restore webmail emails without any size or count restrictions.
It also offers a simple user interface; every user can back up Webmail emails.
Users can also try its free demo version on their system to check its efficiency and functionality.
Working procedure of the Shoviv IMAP Backup and Restore Tool:
Steps to back up Webmail emails:
Open the tool and create the backup directory for Webmail email backup.
Now, click the Backup Jobs and create a backup project to download Webmail emails.
Then, enter your Webmail account details to connect it as the source.
Give a name to the backup job, map the source to the target, and select the backup directory.
After that, filter items using the folder and date range and use the scheduler to automate backup.
Make other changes on the settings page and click the Create Backup Job button.
Steps to restore Webmail emails:
Start the Shoviv IMAP Backup and Restore Tool.
Create a backup directory from the location where you want to restore Webmail emails.
After that, tap the Restore Jobs and select the file format to restore.
Add the backup directory, enter the restore job name and your Webmail details, map the source to the target, and click Next.
Then, set the date range and folder criteria to filter items.
Modify restore project details on the settings page.
Lastly, review the complete Webmail restore project and click the Finish button.
The Closing Thoughts!
Backup and restore tasks are crucial for startup, mid and large-scale organizations to maintain their confidential data. However, using traditional methods to back up and restore Webmail emails is challenging. Moreover, the backup and restore tasks can take ample time to complete.
Users can use the Shoviv IMAP Backup and Restore Tool to quickly and effortlessly back up Webmail emails. Users can also use this tool to restore Webmail emails. So, they can easily manage both processes (backup and restore) with the help of a single platform.
Microsoft Outlook is a well-known email client that offers the ability to manage emails, calendars, and contacts. Understanding how to import contacts to Outlook & export Outlook contacts is a valuable skill whether you are looking to switch to a new device, backup contacts, or share a contact list. This technical write-up will deeply explore the step-by-step procedure for importing contacts into Outlook & exporting contacts from the Outlook for all editions. (Outlook 2019, 2016, 2013, 2010 and Outlook Web).
Table of Content
How to import contacts into Any Outlook version?
Users who have contacts in the CSV file format can easily import contacts to Outlook. Here, we will share the complete steps to proceed with the contacts importing procedure.
Steps to import contacts to Outlook from CSV:
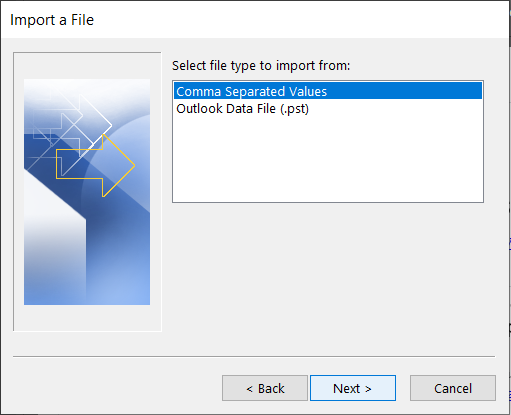
Open Microsoft Outlook and go to the File tab.
After that, select the Open & Export and click the Import/Export option.
Now, choose the Import from another program or file option and click the Next button.
Then, kindly select the Comma Separated Values option and hit the Next button.
For Outlook 2010:
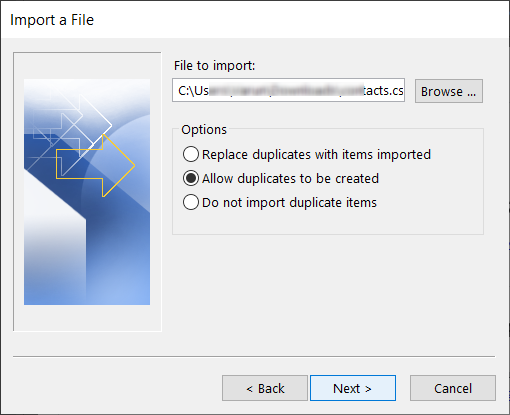
Opt for the Import from another program or file and select the Microsoft Excel Comma Separated Values (.csv).
Thereafter, tap the Browse button, select the CSV file from your system to import contacts, and click the OK button.
Now, continue with Next.
Finally, select the folder (contacts) where you want to export CSV file contact data.
Using the above steps, users can easily import contacts from the CSV file into any Outlook version.
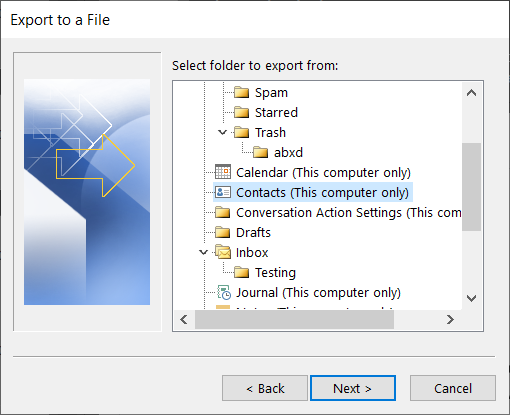
How to export contacts from Outlook email client?
Here, we will share how to export Outlook contacts from all editions, including Outlook 2019, 2016, 2013, and 2010. Let us start with a brief step-by-step procedure for exporting contacts from the Outlook program.
Guide to export contacts from Outlook 2019/2016/2013:
Start your Microsoft Outlook application and click the File tab.
Afterwards, navigate to the Open & Export and choose the Import/Export option.
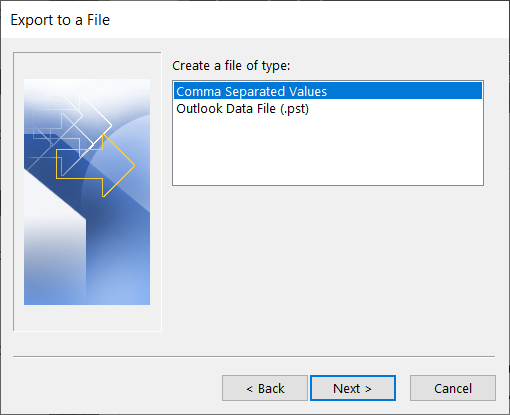
Then, you have to select the Export to a file option and press the Next button.
Now, choose the Comma Separated Values (or Microsoft Excel) option, then click Next.
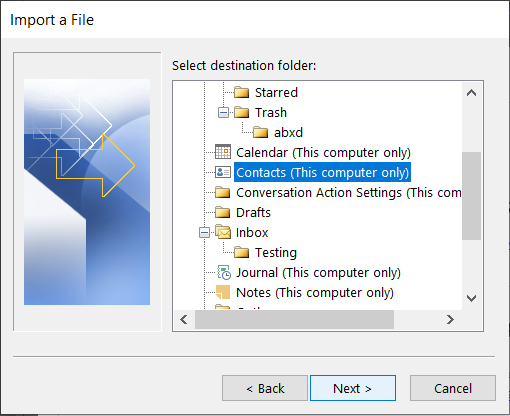
After that, select the Contacts folder you want to export and tap the Next button.
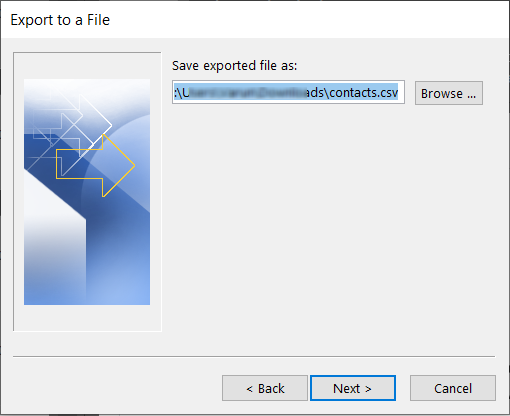
Click the Browse and select the destination folder where you want to save the exporting CSV file.
Then, type a name for the CSV file and click OK.
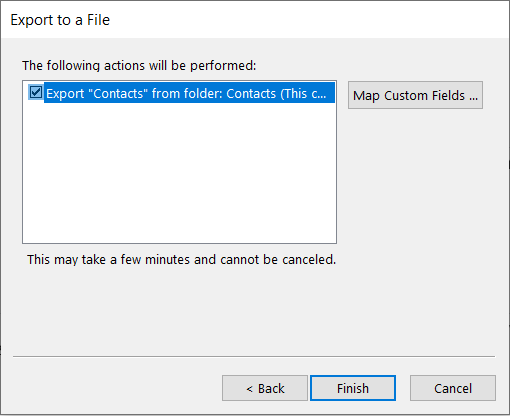
Here, Change Destination if needed and Map Custom Fields if your CSV file has several fields and you want to map to the correct Outfields.
At last, tap the Finish to begin exporting Outlook contacts to a CSV file.
Steps to export contacts from Outlook 2010:
Launch your Microsoft Outlook 2010 and navigate to the File tab.
Next, go to the Options and select the Advanced option.
Scroll down and click the Export button from the Export section.
After that, choose the Export to a file option and tap the Next button.
Here, you have to choose the Comma Separated Values (or Microsoft Excel) option and click Next.
Select the Contact folder you want to export and continue with the Next button.
Locate the target folder using the Browse button and tap the Finish.
This is the complete guide on how to export Outlook contacts to a CSV file.
How to import contacts to Outlook Web & export contacts from Outlook Office 365?
We will cover two processes in this section: How to import contacts to Outlook web or Outlook.com and How to export contacts from Outlook web or Outlook.com.
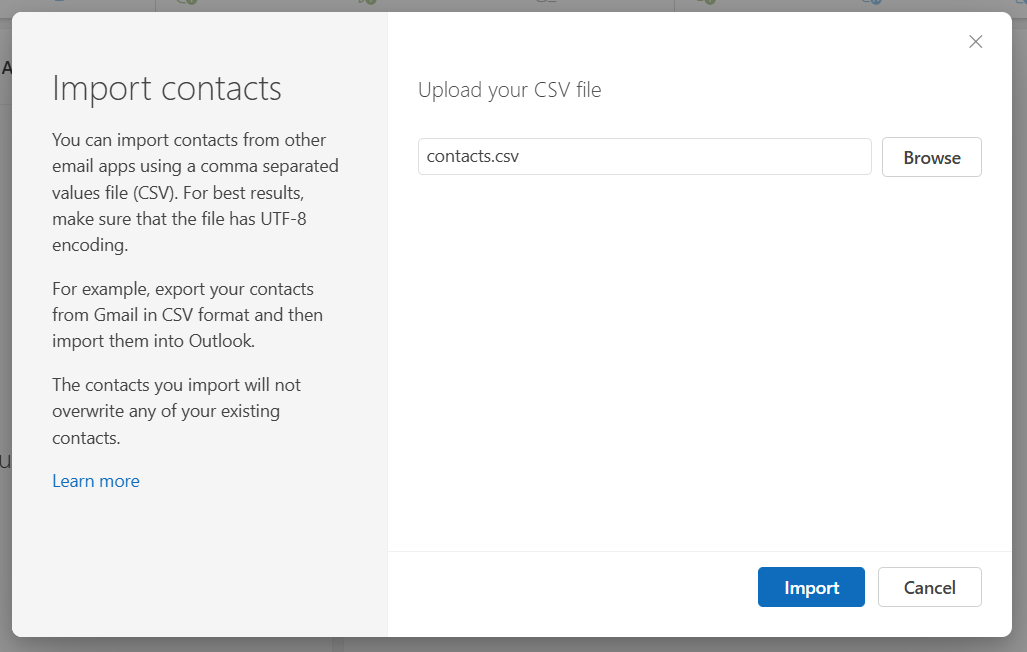
Instructions to import contacts to Outlook Office 365 using CSV:
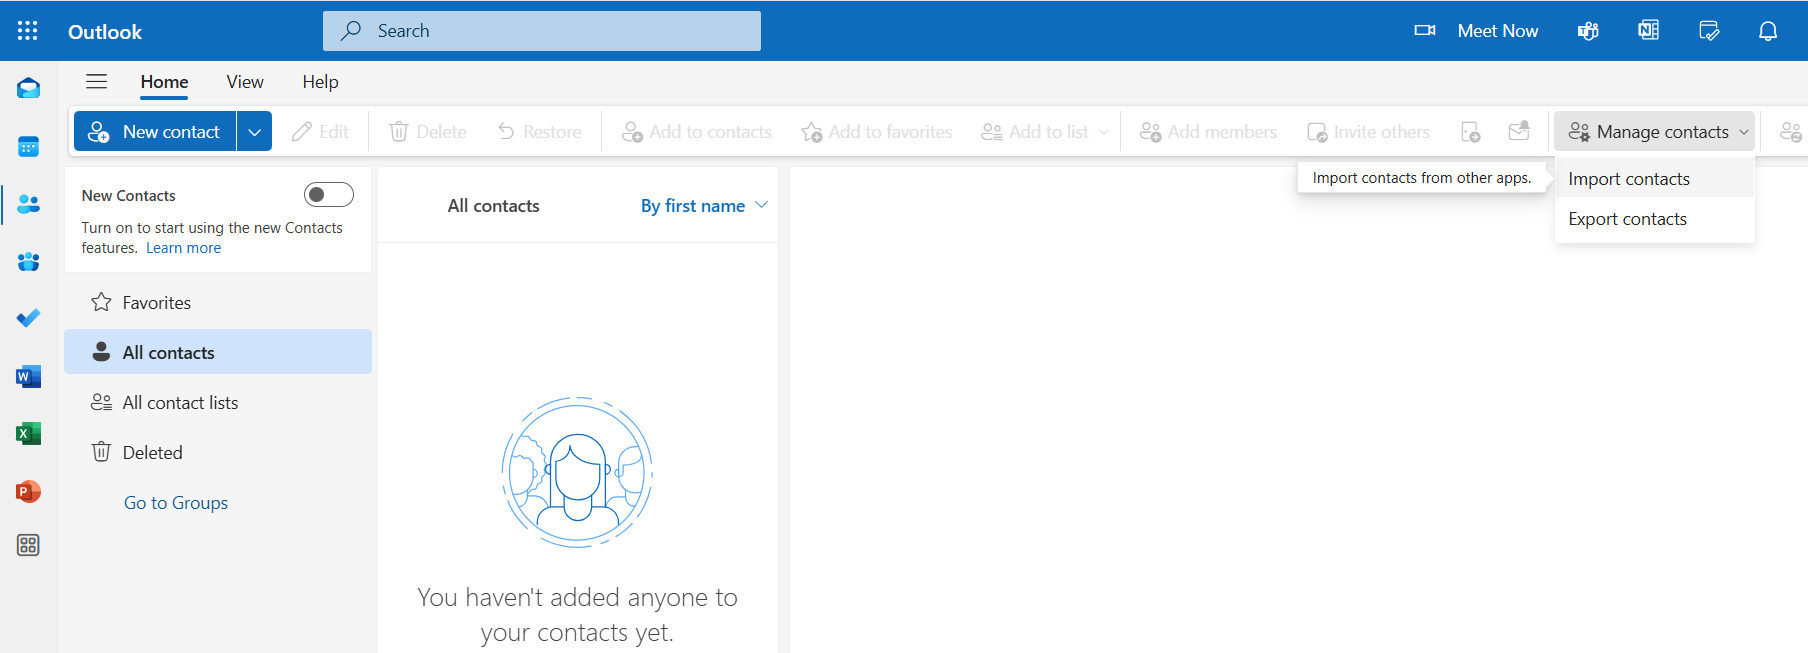
Open your browser and log in to the Outlook web or Outlook.com.
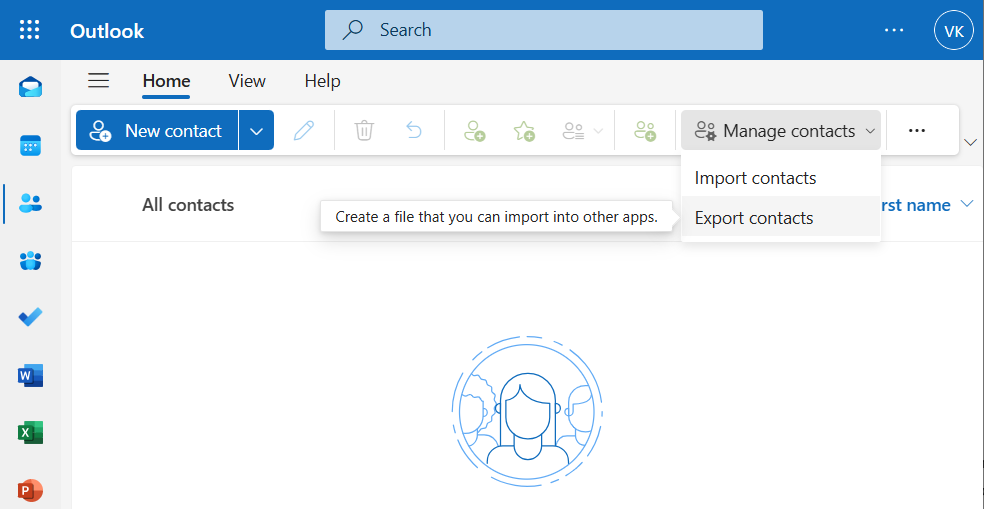
Then, navigate to the People option from Outlook’s dashboard.
Now, you have to move to the Manage Contacts section and click the Import Contacts option.
Tap Browse, select the CSV file containing the contact list and click Open.
Lastly, click the Import button to move contacts to Outlook Office 365.
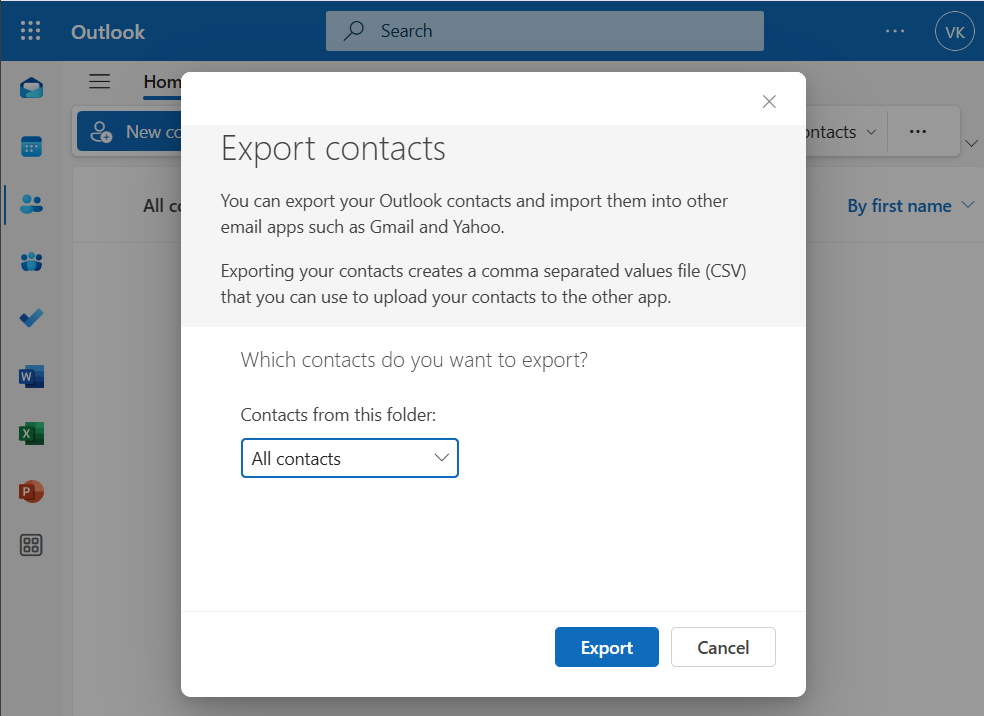
Guidelines to export contacts from Outlook web:
Login to Outlook web using your credentials.
After that, move to the People section from the side panel.
Go to the Manage contacts section and hit the Export contacts option.
Then, select the contacts you want to export.
After choosing the contacts, hit the Export button.
Why & how to convert CSV to UTF-8 encoding using Microsoft Excel?
Most of the time, users can import CSV file contacts list data to the Outlook program. However, the problem can arise when your CSV file contact contains Greek, Arabic, Cyrillic, or Japanese characters. In this scenario, users should save the contacts CSV to UTF-8 encoding.
Note: If the contacts in the CSV file contain only English alphabet characters, then you can directly import contacts to Outlook without a single issue.
Steps to convert CSV to UTF-8 encoding using Microsoft Excel:
Open your Microsoft Excel application on your Windows PC.
After that, create a blank document or workbook.
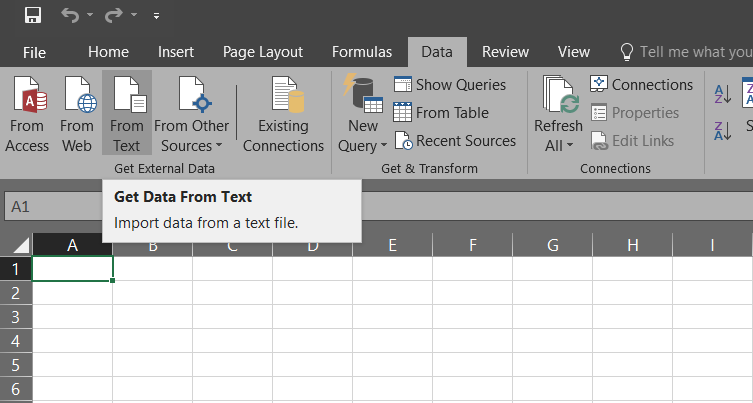
Now you have to head to the Data section and choose the From Text/CSV option.
Then, browse the exported CSV file from your system and click the Import button.
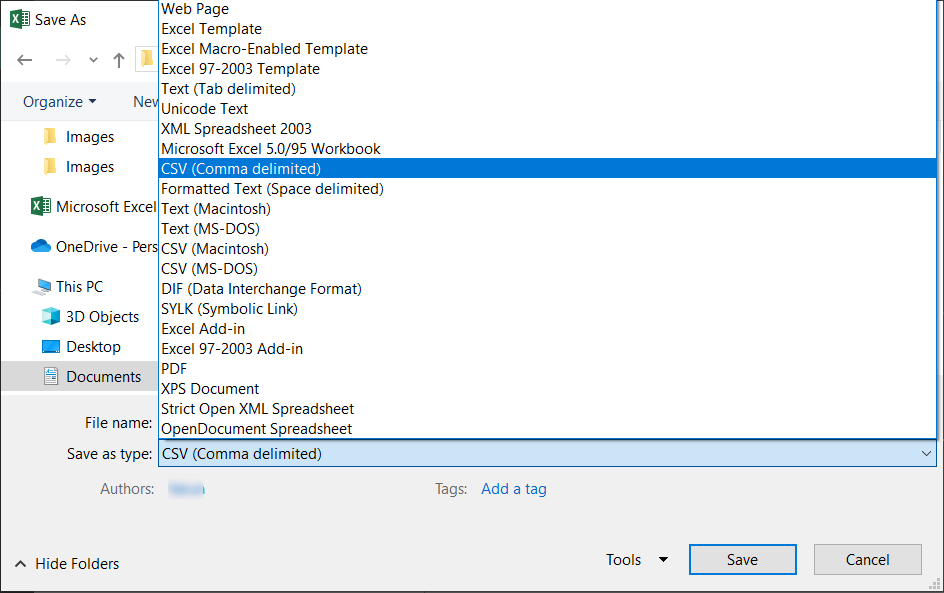
A dialogue box will pop up; select the 1251 Cyrillic Windows and click Finish.
Verify that all characters are visible in the Excel and go to the File tab.
Proceed to the Save As option, select the CSV UTF-8 (Comma delimited) (*.csv) option as file type, and click the Save button.
Why choose Shoviv Software?
Organizations ought to import and export Outlook contacts for professional and personal needs. We have shared manual tricks that users can use to import contacts to any Outlook version and export Outlook contacts. However, the manual way only handles smaller-size data at once and can consume too much time to complete the process.
So, the Shoviv Outlook PST Repair Tool will be a streamlined and robust approach for users to import & export Outlook contacts to CSV or vCard formats. This software works without any restrictions on the PST file size and count. It offers a simple user interface, so no technical knowledge is necessary to process the task.
Now it is on you!
Whether you are planning to switch to a new system, backup contacts or share a contact list, it is crucial to have an understanding of how to import contacts to Outlook and export Outlook contacts. This blog explored various practices that users can implement to import & export contacts from all Outlook versions (Outlook 2019, 2016, 2013, 2010, and Outlook Web). Users should use the Shoviv Outlook PST Repair Tool for an effortless procedure for importing and exporting contacts without restrictions. Users can also try its free trial version on their Windows device and process the first 50 items per folder to the target at no cost.
Google Workspace, formerly known as G Suite, is a suite of tools designed to provide business owners with a comprehensive solution for their work needs. Choosing Google Workspace as your business email solution is a smart move. It’s user-friendly, and convenient, and allows employees to access their essential content from almost anywhere. Google has a strong track record of keeping data safe, giving you peace of mind about the security of your business communications.
Despite Google Workspace’s robust security measures, various factors can still lead to the loss of your Google Contacts. While Google Workspace is responsible for storing vital data, it’s not accountable for backing it up or restoring it in case of loss. The responsibility lies with you to protect your data and keep backups. Safeguarding your Google Contacts through backup is not just a necessity, but a practical business decision that puts you in control of your data.
Learn how to efficiently back up Google contacts with this simple guide. We’ll guide you through every step to fully back up your data, emails, documents, and most important, your contacts. So, let’s dive into the article promptly.
Table of Content
Why is it important to back up Google contacts?
Firstly, understand the importance of taking a backup of Google Workspace contacts before applying the methods. Let’s talk about why backups are crucial and essential.
Data Integrity: Data corruption can strike even the most well-ordered systems. So, keeping backups lets you recover data from an earlier, safe version, protecting its integrity.
Business Continuity: In a data-driven world, even a tiny loss of information can bring business to a standstill. Frequent backups safeguard against interruptions, keeping your business running smoothly.
Regulatory Compliance: Sectors such as finance and healthcare are bound by rules that require routine, precise data backups, typically with defined retention times.
Disaster Recovery: Sudden events such as natural disasters or fires can result in significant data loss. A solid backup can speed up the recovery of essential data when problems arise.
Archiving: By maintaining backups, you create a timeline that reflects all alterations over time. It is especially beneficial for monitoring development, spotting patterns, or fulfilling legal obligations.
Cyber Security: In case of a cyber-attack like ransomware, having an up-to-date backup means the user can restore their data without giving in to the demands.
Peace of Mind: Knowing your data is backed up gives you confidence and calm. You can tackle tasks boldly, knowing your data remains secure and retrievable even if something goes wrong.
What are the methods for the Google contacts backup?
Two approaches are available to backup Google contacts. First, we’ll explore manual approaches, then conclude with a section on third-party software.
Manual methods for Google Contacts Backup
You can backup contacts manually using two options: Data Export Feature and Google Takeout Feature.
Method 1: Backup Google Contacts via Data Export Feature
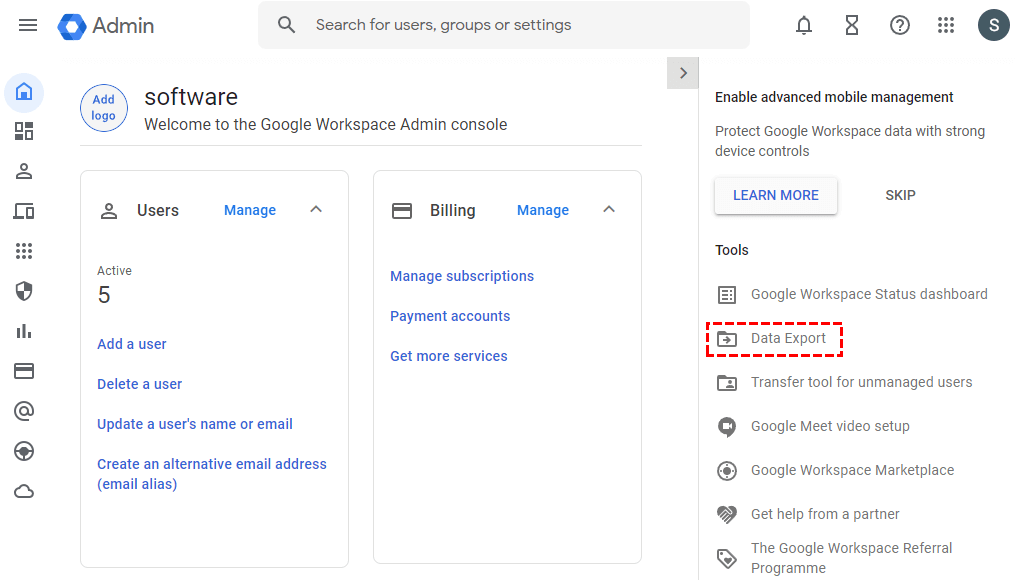
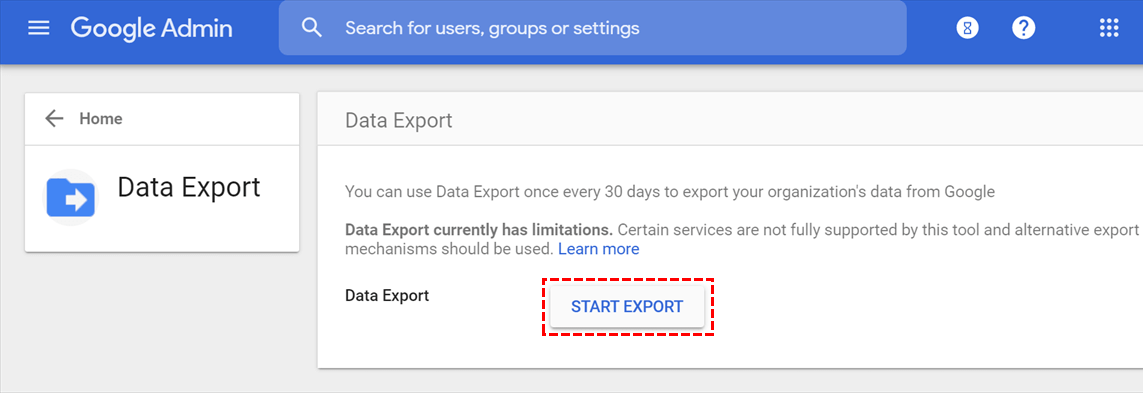
Every Google app’s commercial license comes with a ‘Data Export’ feature. With the data export option, you can back up individual G Suite users by accessing their accounts one at a time. Unfortunately, only G Suite admins can use this tool. However, it allows admins to retrieve and protect all user data with no expectations securely.
Click on ‘Tools‘ and select the option for ‘Data Export.’
Press the ‘Start Export‘ button to begin your Google Workspace backup process.
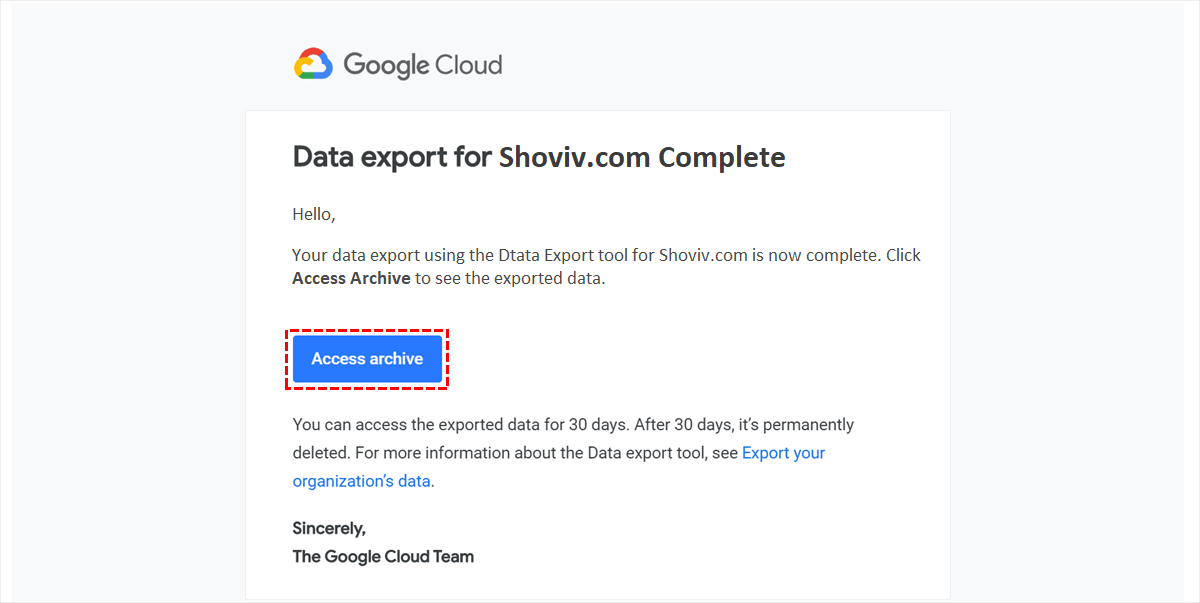
Google may take up to nine days to process your request and send you a confirmation email. So please wait for it.
After opening the email, hit the ‘Access Archive‘ option.
Now, download the backup files for each user in Google Workspace, one at a time.
However, this solution has significant limitations, rendering it inadequate for backing up G Suite. There are some limitations associated when backup Google Contacts.
Limitations of this Manual method:
Initiating the backup means you’re committed until it’s done.
It’s not possible to export only certain data types like emails, calendars, or contacts.
A drawback of this method is that only G Suite admins have access.
It’s not possible to choose specific users or limit the number of Google Workspace accounts for backup.
You may have to wait for nine days before the data becomes accessible.
Once the data backup begins, this feature will be unavailable for 30 days.
Method 2: Backup Google Workspace Contacts via Google Takeout Feature
Google offers a tool known as Google Takeout. Just similar to the first method, this one also focuses on exporting contacts from a single Google account. It compiles everything into a downloadable archive for backup.
Visit the Google Takeout page and sign in using your Google Workspace account.
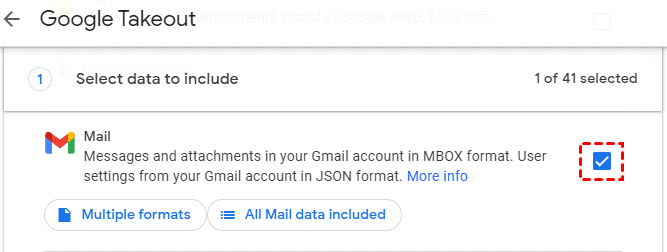
By default, all Google services are selected. Press ‘Deselect All‘ to clear the choices.
Scroll to the service list, find ‘Mail,’ and select the checkbox next to it.
Click the ‘All Mail Data Included’ link to personalize your backup settings.
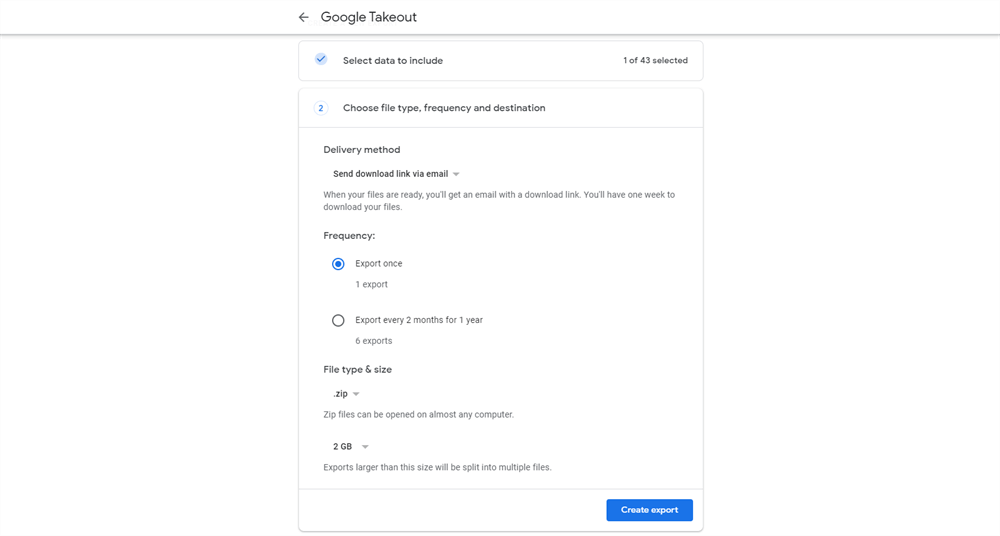
Please set up your backup delivery method: either email it to yourself or store it in a box, Dropbox, OneDrive, or in the local.
Choose your backup’s file format and size; if it’s too big, it can be broken down into smaller pieces.
Hit the ‘Link Account & Start Export’ button to begin your backup.
After creating the backup, you’ll notice a progress bar showing the status.
Once the backup process is done, you can choose your preferred spot on your device to save the data.
Before using this Google contacts backup approach, users need to consider its various limitations.
Limitations of this Manual method:
You have to complete the process for every user, one by one.
There is no option to restore; you can back up or export data offline.
An admin must either perform exports manually or set up a DIY script to handle them.
Users can perform backups every 30 days at the most.
There’s a chance you’ll experience issues with Google Takeout.
These manual methods, while helpful, only sometimes offer a solution for every scenario. With many contacts, creating separate VCF files for each can become a drawn-out process. To sidestep these issues, best to rely on professional solutions. Protect your Google contacts by backing them up with a third-party facility such as Shoviv G Suite Backup & Restore Tool.
How to backup contacts in Google Workspace using a professional method?
The Shoviv G Suite Backup & Restore Tool allows users to effortlessly back up their contacts, ensuring they never lose important contact information again. It has successfully exported contacts from over a million mailboxes, performing flawlessly each time. Moreover, restoring deleted Google contacts is a breeze, allowing you to recover them from any point in time without the hassle of manual solutions. With its trusted features, this tool is a go-to solution for backing up contacts as well as emails and calendars. Let’s take a moment to review the features of this tool before diving into the contact backup process in Google Workspace.
Features of Shoviv Google Workspace Backup Tool
The software lets you back up several accounts including emails, contacts, and calendars.
Users can filter out unwanted contacts before backing up to Google Workspace and oversee the entire backup process on the dashboard.
This software works on job-based processing hence you can back up multiple mailboxes in a single go.
The software offers multiple file formats to back up: PST, MBOX, MSG, EML MHT, and HTML.
The tool’s intuitive design ensures that even newcomers can easily back up their Google Workspace contacts.
Shoviv Google Workspace Backup & Restore Tool is fast and ensures no data loss when backing up Google Workspace contacts.
No matter what your Windows version is, the tool is ready to go on any system.
Wrapping up:
Contacts are essential in both personal and professional life, so losing access to them can disrupt daily activities. To prevent a crisis, it is wise to back up important data every day. Ensuring regular backups of Google Workspace contacts helps protect your data, meet legal obligations, and guard against accidental deletions.
In this article, we have outlined various methods to backup Google Contacts. You can back up Using backup methods like Data Export Feature, Google Takeout Feature, and third-party professional solutions that ensure smooth data recovery, compliance, and business continuity. However, it’s important to note that the manual methods mentioned are only guaranteed to work in some situations. If a user is searching for a guaranteed or reliable solution, then they must use Shoviv’s utility explained in the article.
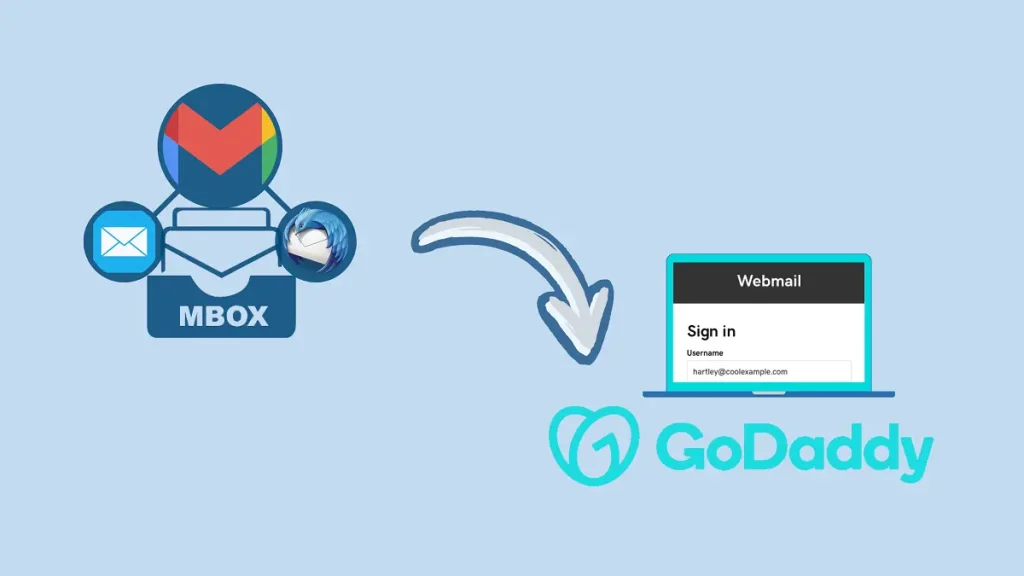
Do you want to know the procedure of importing MBOX to GoDaddy webmail? This process might seem daunting at first. But with a proper stepwise guide, you can import MBOX to GoDaddy webmail in a straightforward manner.
MBOX is a broadly used file format supported by a lot of mail clients, including Thunderbird, Apple Mail, Eudora, etc. It stores a large number of emails in a single file. On the other side, GoDaddy Webmail is a reliable email service that offers extraordinary features for both personal and business communication.
When users import MBOX files to GoDaddy Webmail, it will help them keep all essential data easily accessible from one location. However, GoDaddy doesn’t support direct MBOX imports, so we need to use alternate ways to import emails to the GoDaddy account. This blog will break down all solutions in easy steps to guide users in simplifying the MBOX emails to GoDaddy webmail migration.
Table of Content
What are the practices for MBOX to GoDaddy account import?
Users can cover this importing task with the help of manual and professional approaches. The following section will share the best manual practice to import MBOX to GoDaddy webmail. Then, we will cover professional software to speed up and efficiently finish the MBOX to GoDaddy webmail migration.
Let’s now go over the manual way to complete the MBOX file import task.
How do you import an MBOX file to GoDaddy with manual effort?
To import MBOX emails to a GoDaddy webmail account, users ought to download the Firefox Thunderbird mail client in their system. This practice might seem tricky as it is not a direct approach to moving emails from the MBOX file.
To perform this importing task manually, users need to deploy it in two parts. Firstly, we will configure the GoDaddy account on Thunderbird. Then, we will import the MBOX file to the GoDaddy account.
Part 1: Setting up a GoDaddy account on Thunderbird
Install and open the Thunderbird application in your system after downloading it.
Enter your account details to configure your GoDaddy account and choose the manual configuration.
Then, fill up the information below:
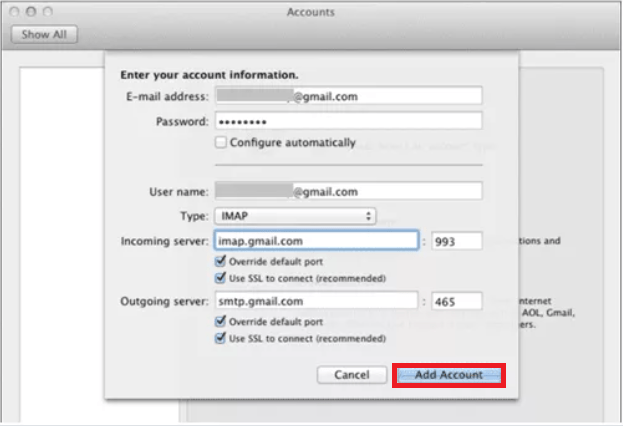
Incoming server: mail.secureserver.net
Incoming port: 993
Outgoing server: smtpout.secureserver.net
Outgoing port: 465
After that, tap the Finish button, and your GoDaddy account will be set up on Thunderbird.
Part 2: Importing MBOX to GoDaddy webmail account
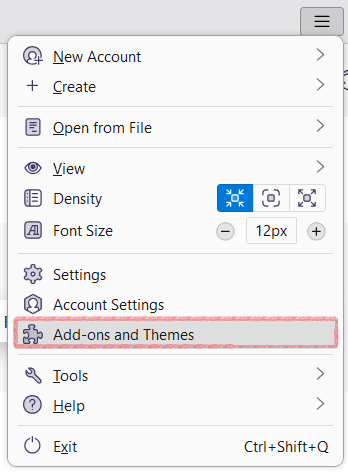
Open the Mozilla Thunderbird application.
Then, navigate to its menu bar and select the Add-ons and Themes option.
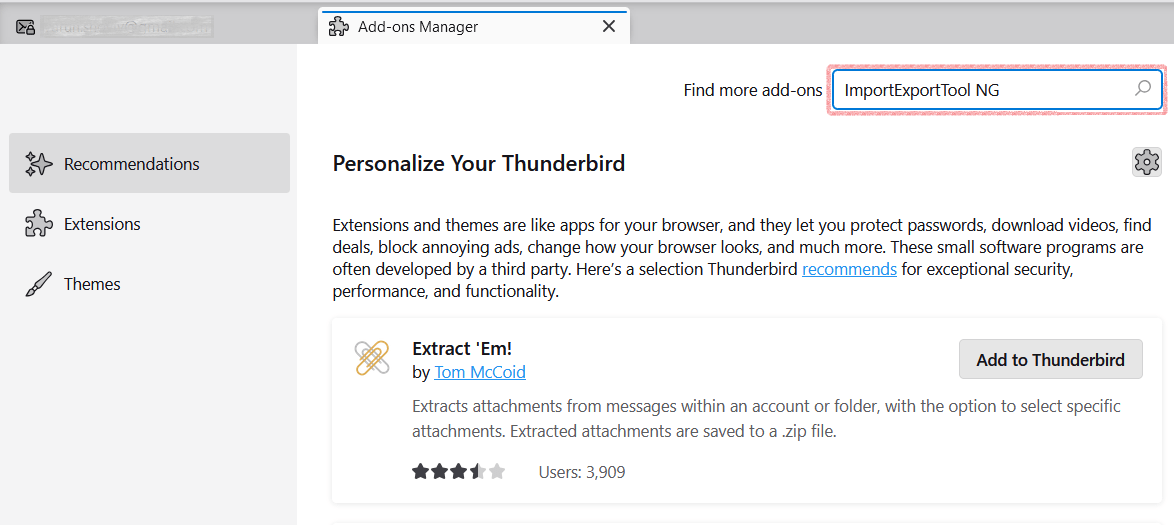
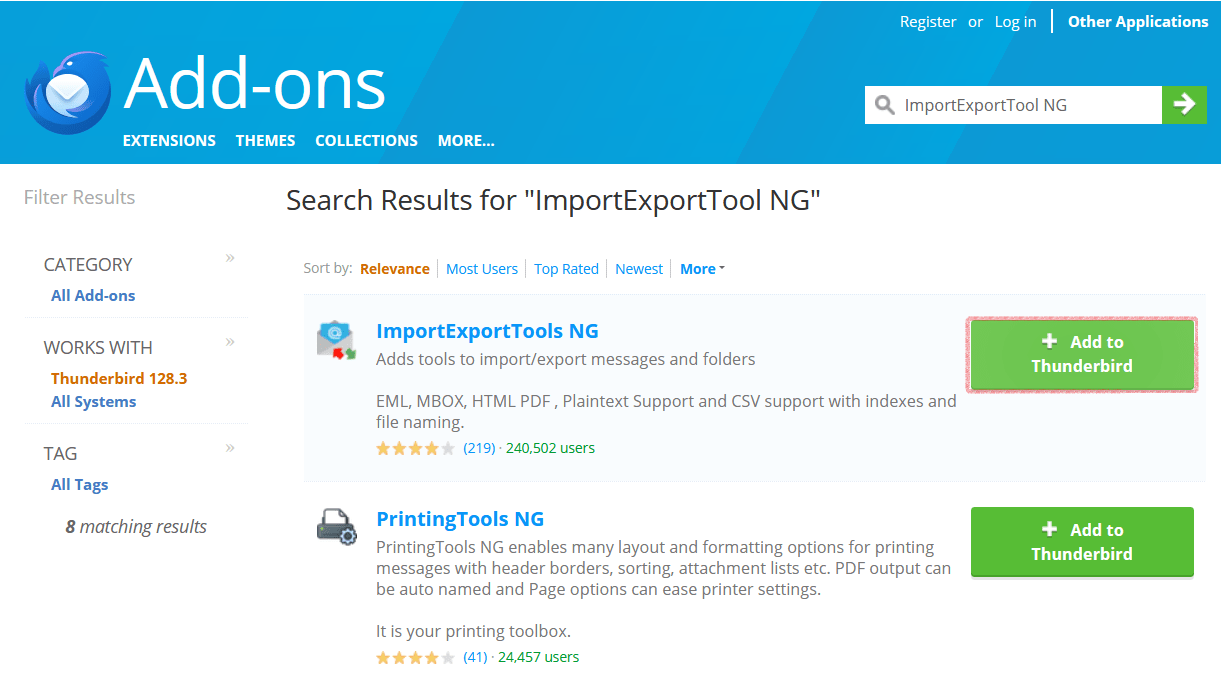
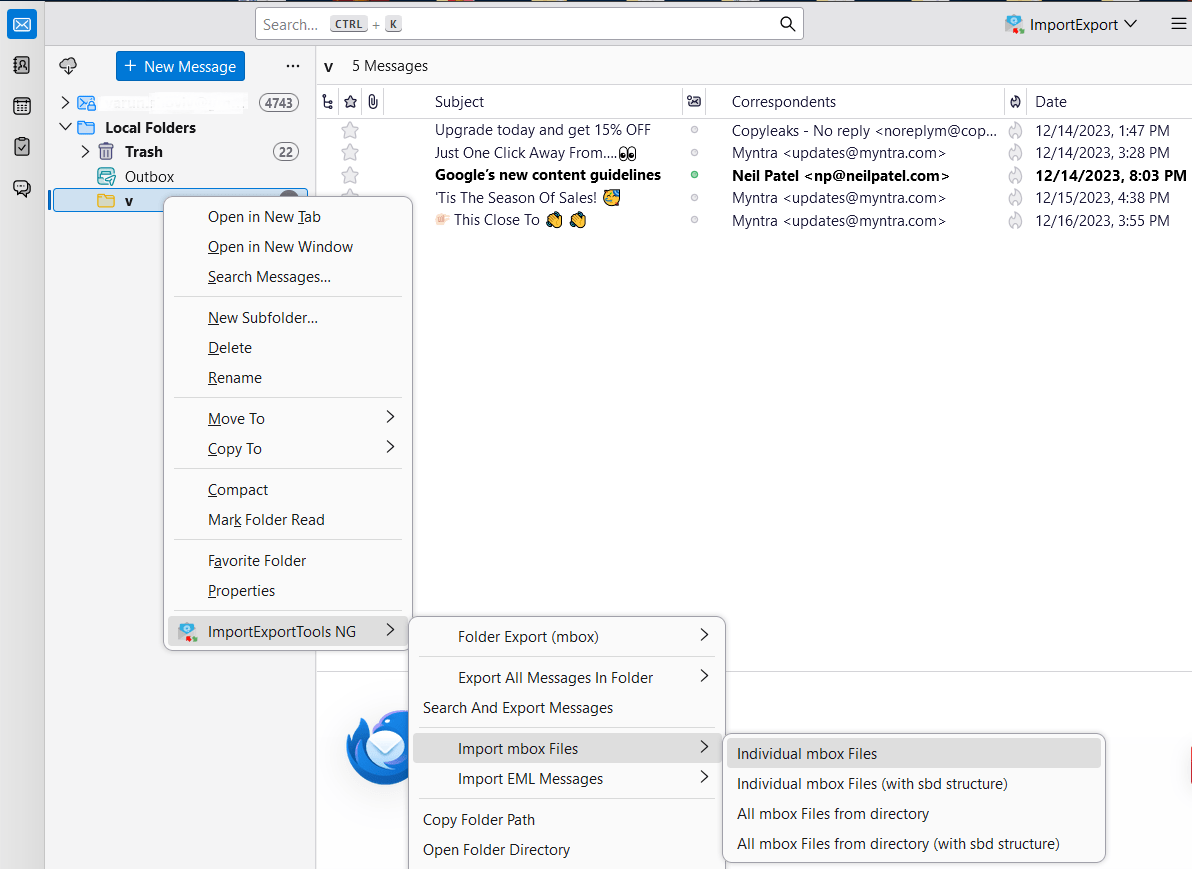
Type ImportExportTool NG in the search bar and press the Enter key.
In the search result, look for ImportExportTool NG and click the + Add to Thunderbird button.
After that, right-click on the folder where you want to import the MBOX file. Then, follow ImportExportTool NG > Import MBOX files, and select the option to import individual files or all MBOX files from a directory. (Here, we are importing individual MBOX files as an example.)
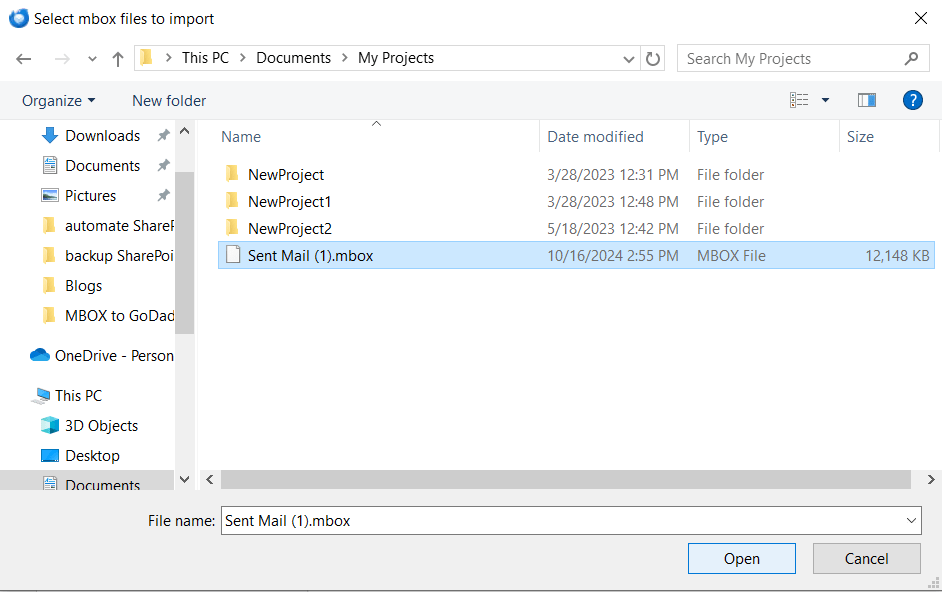
Choose the location where your MBOX file is saved and select it to import into the GoDaddy account.
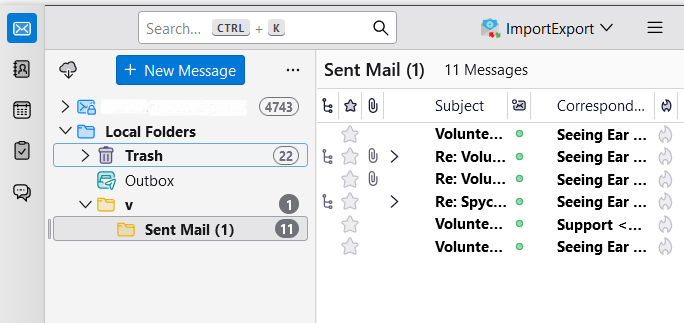
Open Thunderbird and verify the folder where you imported MBOX to check all emails are successfully imported.
Adhering to these steps will help users to easily import MBOX to GoDaddy webmail accounts effectively. However, this solution is only efficient in moving lower-size MBOX files and can disrupt data if it processes large-sized files. Moreover, it doesn’t maintain the emails’ folder hierarchy and meta properties.
The manual solution comes for free, but not perfect if you want to import too many large-sized files. So, implement trustworthy automation, like the Shoviv IMAP Backup and Restore Tool.
An expert tool to import MBOX files to GoDaddy Webmail
Users need reliable and robust software for a secure and effortless migration of MBOX emails to a GoDaddy account. So, they can rely on the Shoviv IMAP Backup and Restore Tool for this. It offers a variety of facilities to overcome the issues during the MBOX file importing task. Moreover, even new users do not need technical skills to import emails to GoDaddy webmail accounts using this professional software. It also allows users to backup their IMAP emails into various file formats, like PST, MBOX, EML, MSG, etc.
This software keeps the folder hierarchy and integrity of the emails when importing MBOX files into the target. It offers a filter option that users can use to add or remove desired items before processing. Users can also set up backup or restore jobs on a regular basis through its scheduler option. It works effortlessly for all IMAP-supported email clients, like GoDaddy, Gmail, Outlook, etc. In addition, it prevents the data against duplicate items when moving emails from the MBOX files.
Steps to import MBOX to GoDaddy Webmail
Install and open the Shoviv IMAP Backup and Restore Tool.
Browse the location where MBOX files are stored and create a backup directory.
Click the Restore Jobs, and select the Export MBOX files with the folder hierarchy option.
Enter the server name and port value, map the source with the target and tap Next.
Apply filters, modify settings if needed and click the Next button.
Review the MBOX import task settings and hit Finish to import emails to GoDaddy webmail.
Final Remarks
MBOX file stores a lot of data that is essential for organizations. So, applying a simple and secure approach to import MBOX to GoDaddy webmail accounts is crucial for users. Moreover, we are also aware that the manual solutions do not provide the results as expected. Hence, proceeding with this task using the Shoviv IMAP Backup and Restore Tool will be an excellent option for users.
Also, users can try its free beta version to know the efficiency of the software and get a practical understanding of its functions. Its free version is capable of processing the first 50 items from each folder to the destination.
Are you planning to transfer from Outlook email client to Google Workspace (G Suite)? Searching to know how to import PST to Google Workspace when switching from Outlook to the G Suite platform? Well, this migration process can be challenging without a genuine strategy. So, we have arrived here to provide users with a simple guide on importing Outlook PST to Google Workspace mailboxes. Moreover, we will also discuss why users are attracted to G Suite and ways to perform PST to G Suite migration task.
This guide will elaborate on the manual and professional methods for moving data from Outlook PST files to G Suite mailboxes. Let’s begin by understanding the reasons for this and learning Google Workspace’s attractive features. Then, we will cover the steps to implement manual and professional methods for importing PST files to G Suite.
Table of Content
Advantages of moving to Google Workspace cloud-based SaaS
When users decide to import data from PST files to Google Workspace, there are multiple factors behind it. We know Outlook and G Suite offer almost identical features and facilities. However, there are still a few features that G Suite provides better than Outlook, which we will discuss below.
Google Workspace provides Gmail for sending or receiving emails; every user is familiar with Gmail. That is the prominent reason users import PST to Google Workspace mailboxes.
Moreover, G Suite permits multiple users to work on the same documents or files at the same time.
It seamlessly integrates with other Google productivity tools, like Google Meet, Calendar, and Drive. Thus, organizations can enhance their productivity and efficiency using Google Workspace.
Furthermore, G Suite provides users with robust security features, helping them prevent data from phishing attacks and other serious threats.
It comes with advanced AI features, allowing users to precede commands through voice, such as sending emails or searching items.
Hence, users are attracted to Google Workspace and willing to import PST to G Suite mailboxes. Apart from this, users can have other reasons why they prefer Google Workspace over Microsoft Outlook.
What are the solutions to import PST files to Google Workspace?
Users can import PST to G Suite mailboxes in manual and professional ways. We will know how to use the GWMMO Tool to migrate PST files into the Google Workspace in the manual method. Moreover, users who want a professional third-party tool to perform this task will also get a reliable way to do it. So, let’s start to know the steps to import PST using both methods.
A manual way to import data from PST files to G Suite
Users can use the GWMMO Tool (Google Workspace Migration for Microsoft Outlook Tool) to import data, such as emails, calendars, and personal contacts, from Exchange or local PST files to G Suite. This tool is offered by Google and requires administrator credentials to process the PST file import to Google Workspace. We will execute this solution in two parts. Firstly, we will export the PST file from Outlook and then import PST to G Suite mailboxes.
Part 1: Exporting PST from Microsoft Outlook account
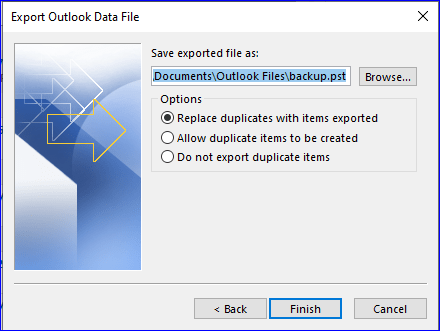
Here, we will share the steps to export data from Outlook to PST. We will use the Microsoft Outlook program to accomplish this task.
Launch Microsoft Outlook on your device.
Select the File menu and click on the Open & Export tab.
Then, tap the Import/Export to continue with the exporting process.
Choose the Export to a file option and press the Next button.
Now, select the Outlook data file option and click Next.
Thereafter, select the mailbox folder you want to back up in the PST file from Outlook.
Use the Browse button to locate the destination where you want to save the exported PST file.
To begin exporting PST from Outlook data, please click the Finish button.
The PST file will now be saved to the selected location. Next, we will import the data from this PST file into Google Workspace mailboxes.
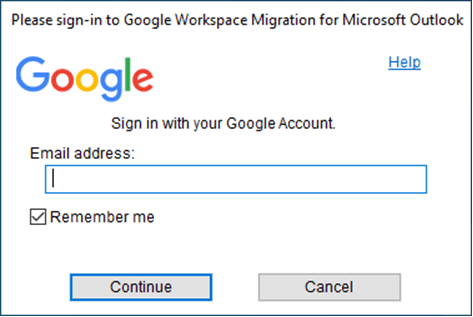
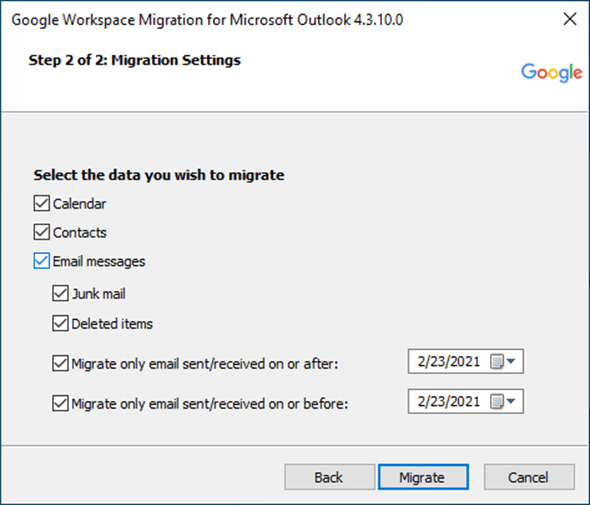
Part 2: Import PST files to Google Workspace using the GWMMO Tool
Users need to download the GWMMO Tool (click here to download) before following the steps. They also require the administrator credentials to set up the GWMMO Tool in their system. Use the below steps to use this tool.
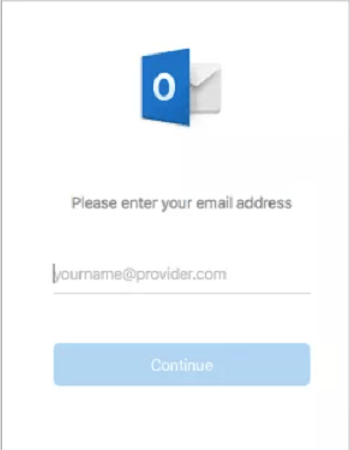
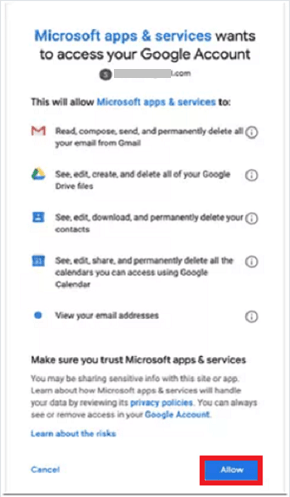
Open the GWMMO Tool, enter your email address and tap the Continue button.
After that, grant the permissions that the tool is asking for.
Now, browse the location of the folder you want to import.
Then, select the folder where you want to import the PST file data.
Press Migrate button to start importing PST to G Suite mailboxes.
Follow these steps to import PST to Google Workspace mailboxes manually. Users can also use an automated solution to process this PST file migration task. So, let’s know one of the best Office 365 backup and restore solutions in the upcoming paragraph.
A trusted tool to import PST files to Google Workspace
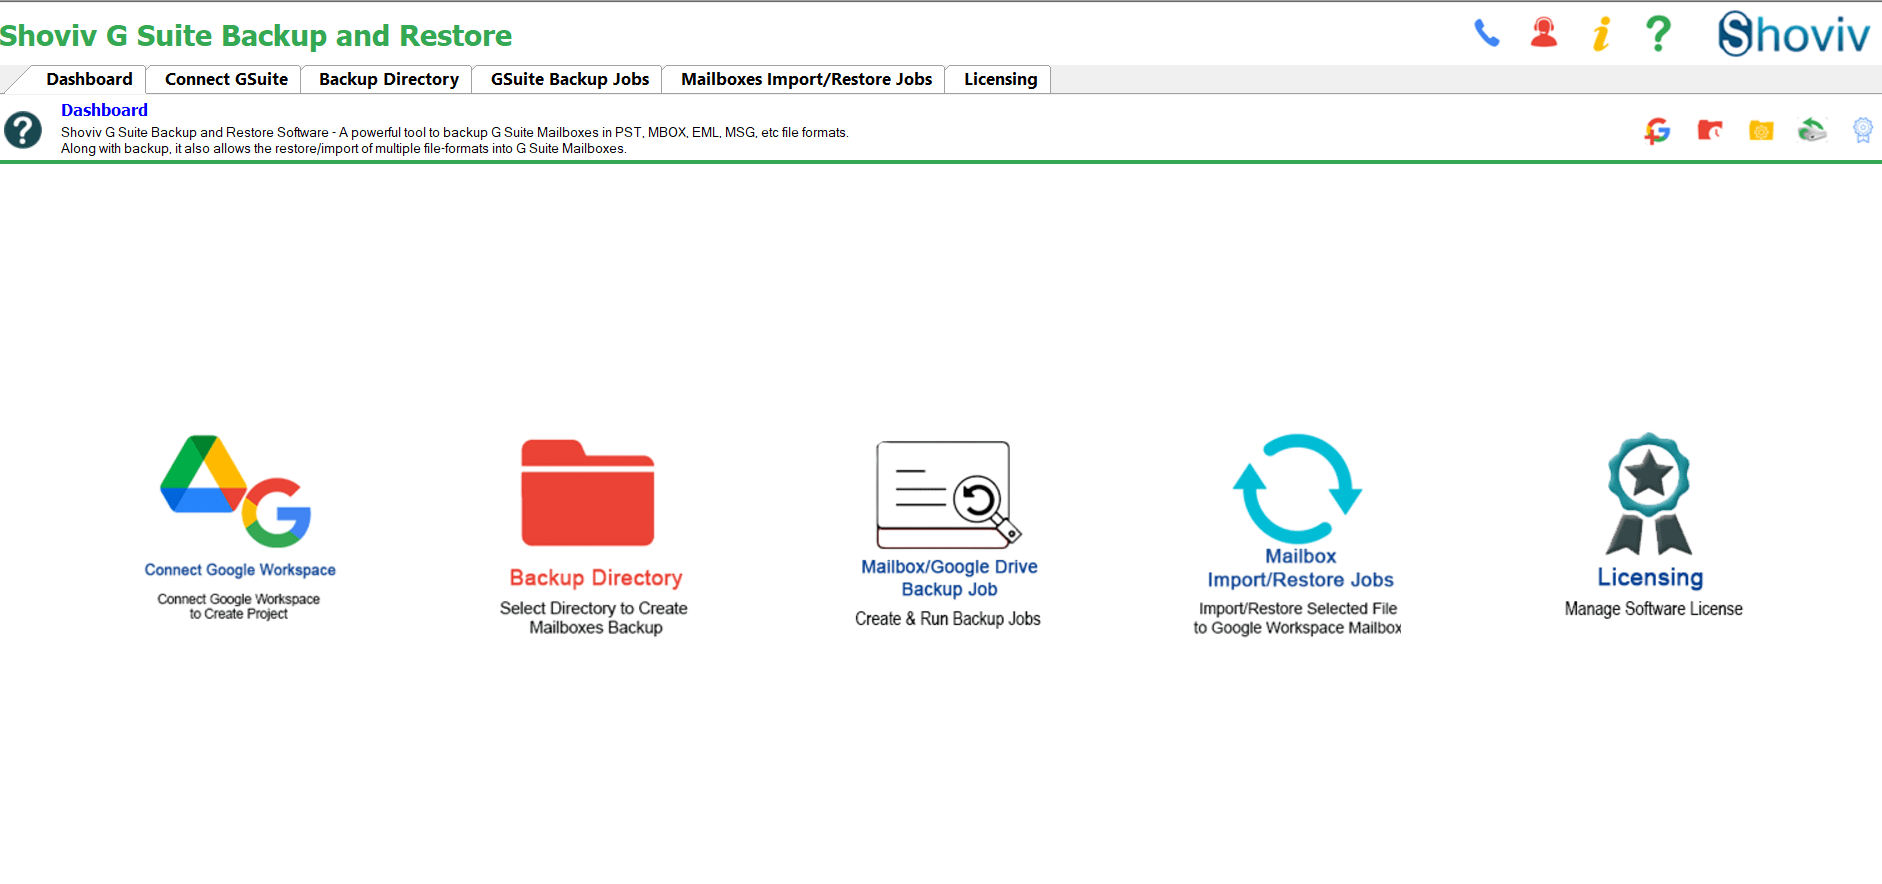
Want a quick and effective way to import PST to your Google Workspace account? The Shoviv G Suite Backup and Restore Tool is the best choice. It offers numerous features to make the PST file-importing task as easy as a cakewalk. Furthermore, users can also import data from PST and other file formats, such as OST, OLM, MSG, etc., to G Suite. This software imports calendars, contacts, and emails from PST files to G Suite. It allows users to process multiple PST files at once without any size limitations. Moreover, it retains folder hierarchy and meta properties of the emails in their original form after processing them.
This software can also export or back up G Suite emails into numerous file formats. Users can efficiently process various backup or restore jobs in this software; the speed of the process will not be affected. It is too easy for new users to import PST to Google Workspace using this professional solution; it comes with a simple user interface, so technical knowledge is not compulsory. Also, the working steps of this Google Workspace Backup and Restore tool are simple and easy to implement. Users can read the below section to know the steps to import PST to Google Workspace using this professional tool.
Quick steps to import PST file data
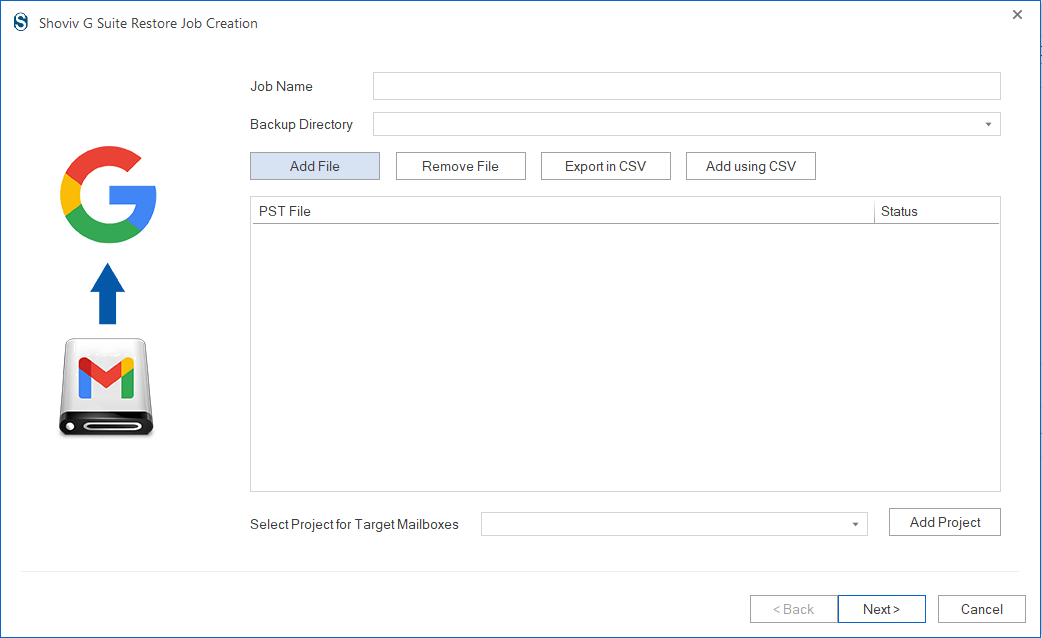
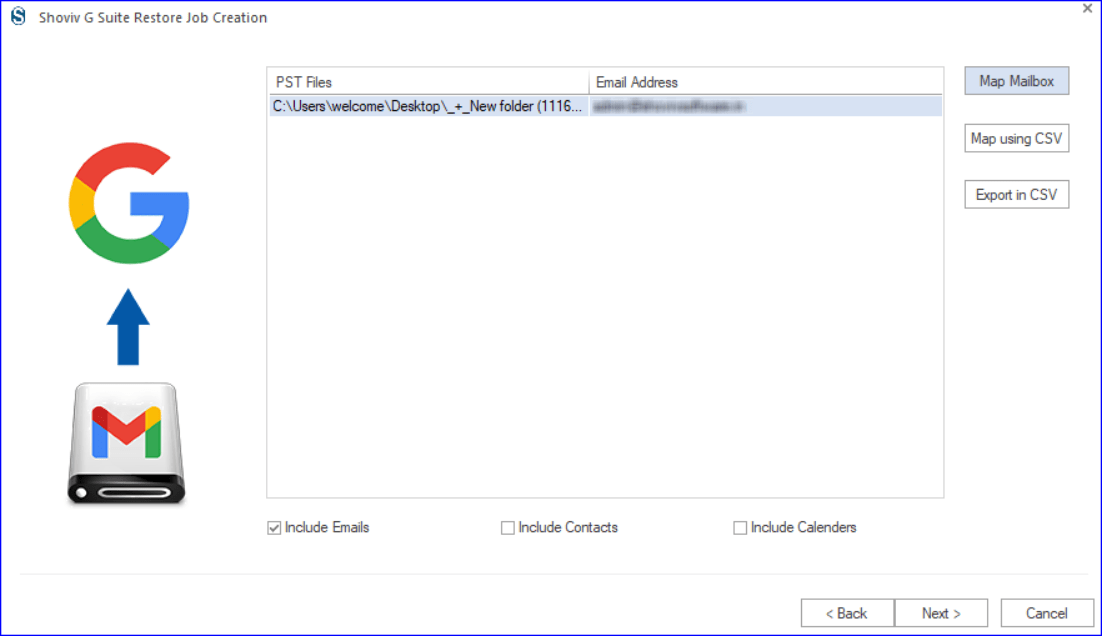
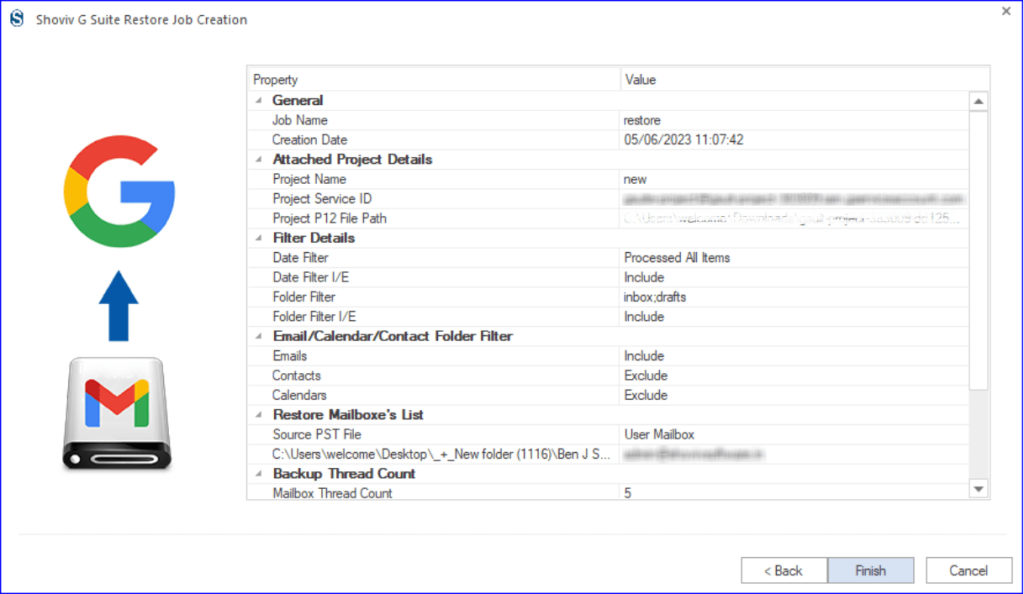
Download and install the Shoviv G Suite Backup and Restore Tool.
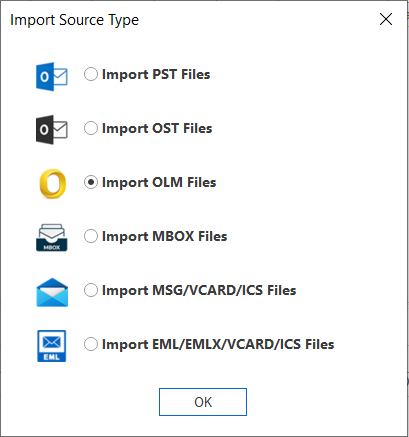
Then, click Mailbox Import/Restore Jobs and choose Import PST files from the source type options list. (You can also import data from other formats to G Suite, such as OST, MSG, OLM, MBOX, etc.)
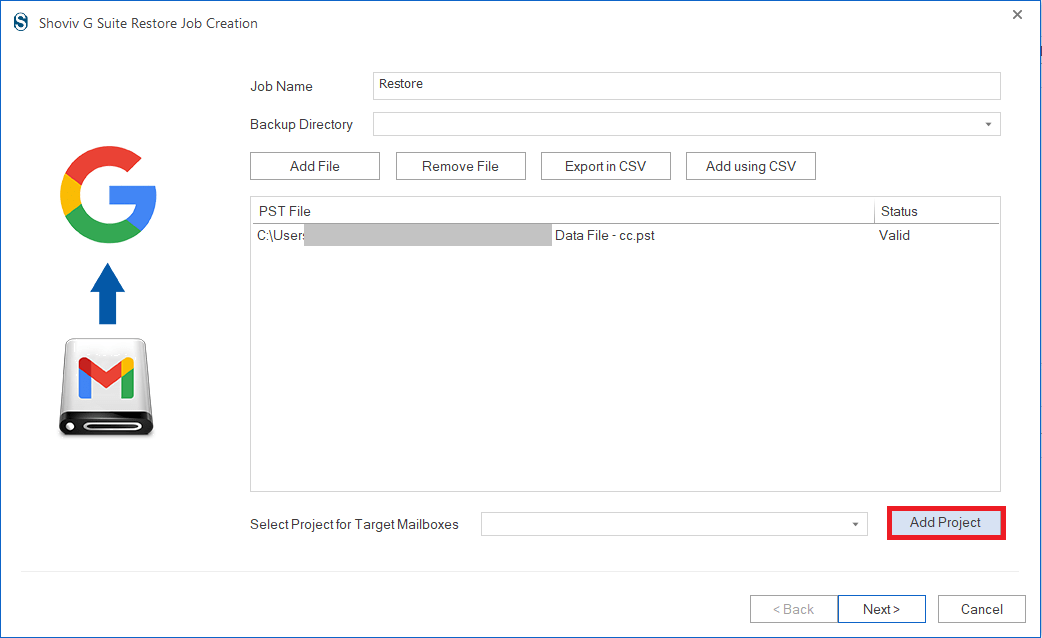
Click the Add File button to add the PST file.
Enter the job name after selecting the PST file to import and click the Add project button.
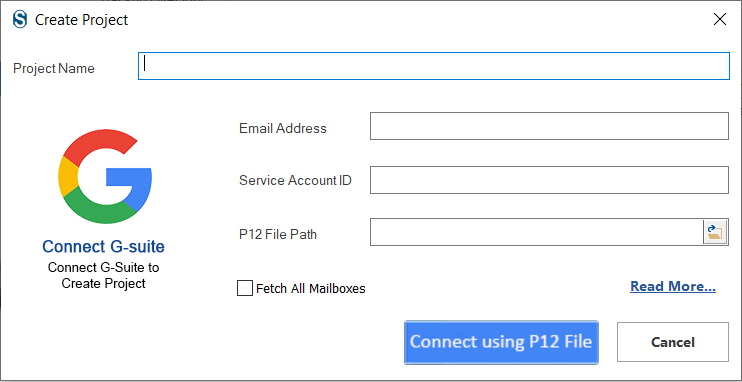
After that, fill in the project name, email address, service account ID, and P 12 file path to select the destination for this restoring or importing task.
Now, map the mailbox and include items such as contacts, calendars, and contacts. Then, tap the Next button.
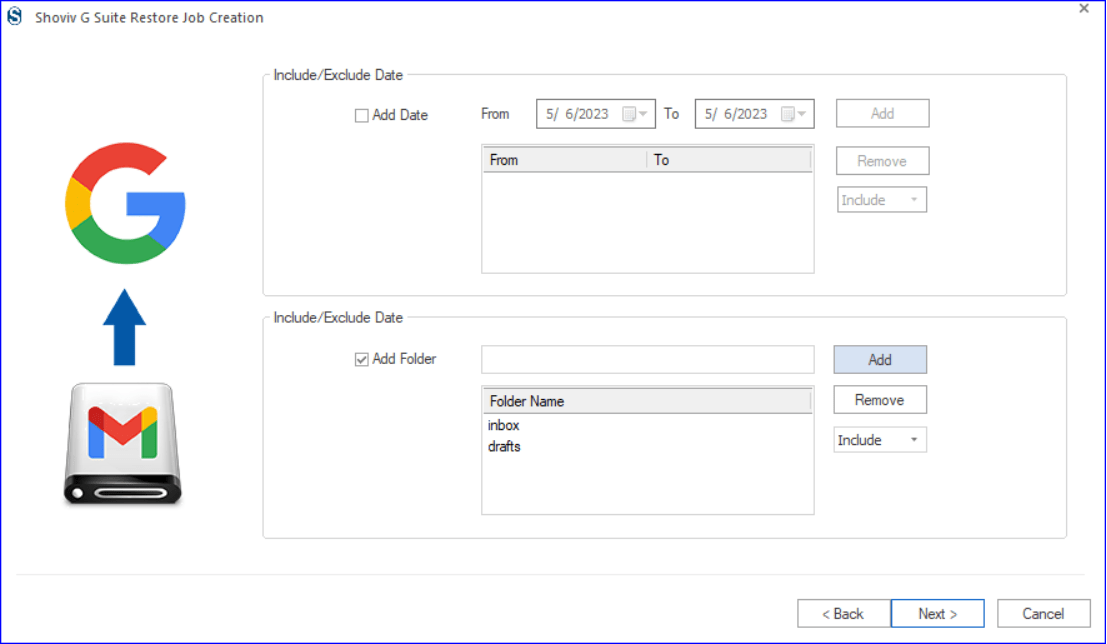
Use the filter option to remove or add items using the date and folder-wise criteria. Select Next to continue.
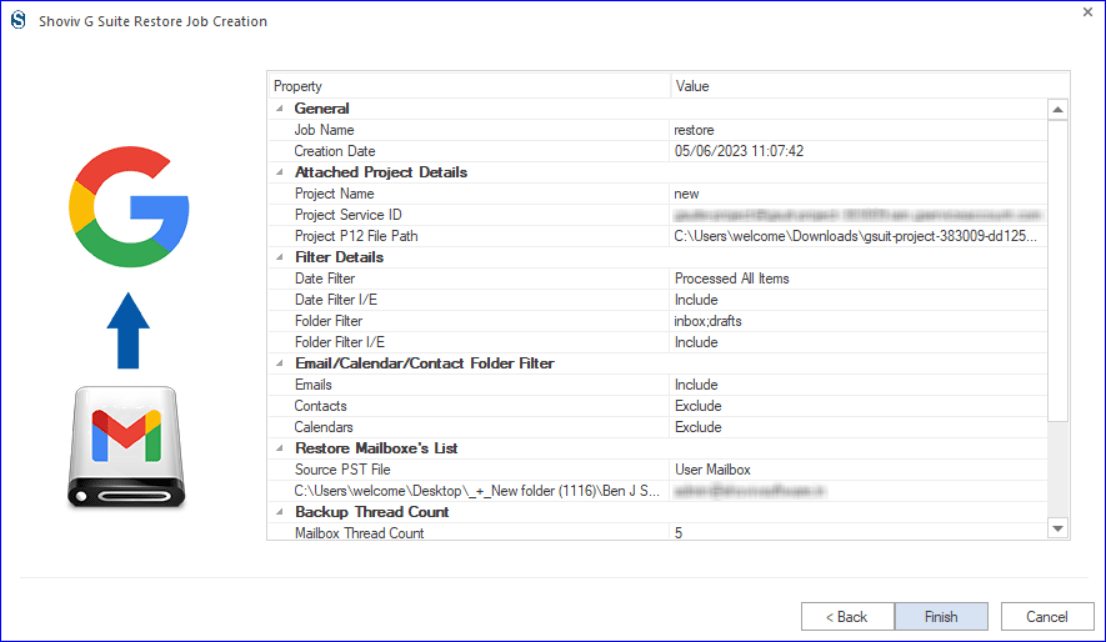
Afterward, select the thread item count, set the failed item limit, and make other modifications needed to import your PST into your Google Workspace account.
Finally, review the complete Office 365 Restore Job settings and click the Finish button.
These steps will help users create restore or import jobs that they can run immediately or at a scheduled time to import data from PST files to Google Workspace.
Conclusion
This guide shares two complete solutions, manual and professional to move the PST file data to G Suite mailboxes. The manual method has the limitation of processing the Outlook PST file. Moreover, it is not capable of handling duplicate items and may result in potential conflicts in users’ Google Workspace accounts. Therefore, adapt the Shoviv G Suite Backup and Restore Tool to import PST to Google Workspace mailboxes. Users can also try its free trial version to know this tool’s features and efficiency. Moreover, users can also ask questions about tools and tasks; our support team is available 24/7 to address their queries.
These days, every organization almost relies on emails to communicate, and managing a large number of emails is tricky. Some users use Outlook for Mac, which stores emails into OLM files. Sometimes, users need to switch to Gmail and know how to import OLM to Gmail business emails (GWS). Moreover, this process allows users to access their essential data quickly, especially for big enterprises.
Gmail is an email client known for its simple user interface and advanced or user-centric features. Users can manage their business emails effectively after switching to Gmail or Google Workspace. So, moving to Google Workspace from other email platforms, like Outlook for Mac, has become a trend.
However, importing OLM files to G Suite or Gmail business emails is challenging. Therefore, users learn the entire process step-by-step to move OLM files without hassle. This blog will teach you in detail how you can import OLM files to Gmail business emails or G Suite securely and quickly.
Table of Content
Why do users adapt Gmail Business over Outlook for Mac?
There could not be a specific reason for importing OLM to Gmail business emails or G Suite. Users consider this migration for multiple reasons, some of which are as follows.
It has a simple GUI, so it’s easy for users to find and manage their emails.
G Suite is a cloud-based platform that allows users to access their emails from anywhere with the internet.
Moreover, it integrates with other Google Services, such as Google Calendar, Drive, Meet, etc. So, it simplifies the process for users to keep all their data in an organized way.
It comes with an impactful security feature and allows users to keep spam emails out of their inboxes.
Using Gmail Business, multiple users can work together and edit documents or files in real time.
Because of these advantages, users switch to Gmail business emails or Google Workspace. If you are searching for a simple way to import OLM to Gmail business emails, your wait will be over in the upcoming section.
A manual practice to import OLM to Google Workspace
You can use manual and professional solutions to import Mac OLM files into Gmail business emails. Moreover, you must configure a Gmail business account to Outlook for Mac to import OML data, including emails, calendars, and other data to process manually. We will cover this manual technique in three phases to import OLM to Gmail business or G Suite. Let us begin to understand the process step-by-step.
Simple steps to import OLM to Gmail business emails
The first phase of this solution will teach you how to configure your Gmail account on IMAP and move forward to importing OLM to Google Workspace. Then, we will configure the Gmail account to Microsoft Outlook for Mac. Let us understand the detailed steps to use this solution.
Phase 1: Set up your Gmail Account for IMAP
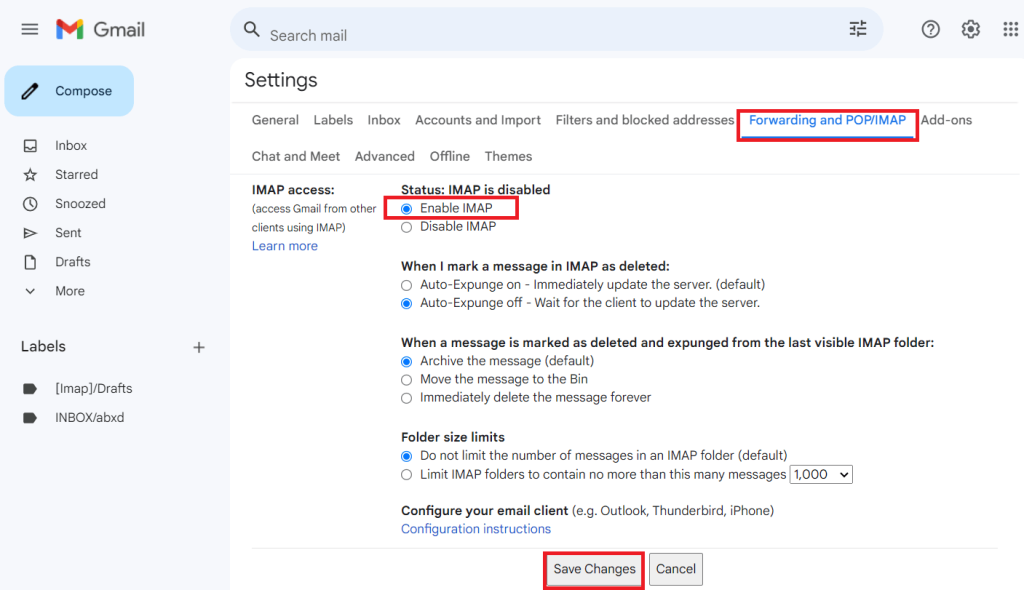
Open Gmail and sign in with your Gmail account and password.
Then, press the Settings tab and click the See all settings option.
Choose the Forwarding POP/IMAP from the Settings page.
After that, select the Enable IMAP option in the IMAP access tab and hit the Save changes.
Once completed the above steps, you will be done with setting up a Gmail account for IMAP. Now, we will understand the following process for importing OLM to Gmail business emails or G Suite.
Phase 2: Add your Gmail account in Outlook for Mac
This process can be particular for each user, depending on their Mac Outlook version. Here, we will share the steps for Mac Outlook, such as Outlook 2011, 2016, and 2019. Kindly follow the steps to import OLM files to Gmail Business or Google Workspace.
Adding Gmail account in Mac Outlook 2016/ 2019:
Launch the Outlook application for Mac.
Select Outlook from the ribbon bar and navigate to the Preferences option.
Then, tap the Accounts option in the Preferences window.
After that, press the (+) button and click the New Account option.
Enter your Gmail address and click the Continue button.
Now, the Google sign-in window will open. Here, enter the Gmail password and hit the Next button.
After that, click the Allow button to grant permission.
Your Gmail account will be configured on Outlook for Mac. Tap Done to finish.
Follow these steps to add a Gmail account on Outlook for Mac if you work on Mac Outlook 2016 or 2019.
Configuring Gmail account in Outlook for Mac 2011:
Open Microsoft Outlook on your Mac.
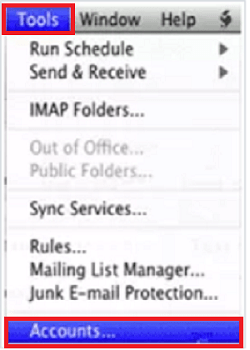
Navigate to the Tools in the menu bar.
After that, select the Accounts option from the Tools drop-down.
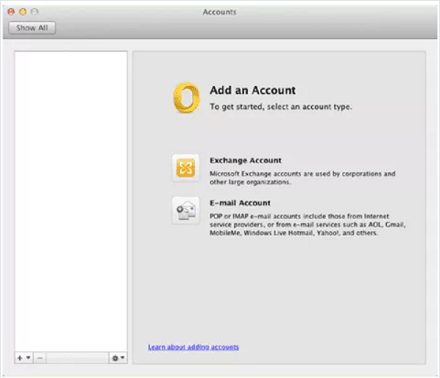
Click the (+) sign and continue with the Email option.
Then, type your name, fill in the Gmail address and password. After entering the details, click the Add Account button.
Thereafter, select IMAP as the account type and enter incoming and outgoing server details if required.
Finally, hit the OK button to add your Gmail account to Mac Outlook 2011.
Phase 3: Import OLM to Google Workspace or Gmail business emails
Select the folder that contains OLM files and right-click on it.
Then, click the Copy or Move to Folder option.
Select the Gmail label name from the new dialogue box and tap the Copy.
Choose the Send/Receive option to import OLM files to Gmail Business emails.
This is the complete procedure of working with the manual solution to add a Gmail account into Outlook for Mac. This solution is free but has some common limitations that can affect the import process.
Limitations of importing OLM to Gmail manually
Users will face many limitations when processing OLM files for Google Workspace emails. Before importing OLM files, users must first understand the complexities of the manual solution.
This solution can take a long period when users are looking to import multiple OLM files to Gmail business emails.
Moreover, this may result in permanently losing OLM file data, like emails and attachments, if users perform a single step abruptly.
Users need a good grasp of technical knowledge to import OLM files manually into Google Workspace.
This method may affect the original folder hierarchy of the emails when moving OLM to G Suite or Gmail business.
These limitations might complicate for users to move their OLM files from Mac Outlook to Gmail business.
Professional OLM to Google Workspace Migration Tool
Users can find various automated tools online to import OLM to Gmail business emails. However, the Shoviv G Suite Backup and Restore Tool is at the top and recommended by professionals worldwide. This software allows users to process multiple OLM files to their business Gmail account or Google Workspace in a single click.
When users work with this professional software, no limitations will be applied to add multiple and large OLM files. Users can quickly restore or import OLM files directly to their business Gmail account. Also, the tool permits users to back up G Suite emails in numerous file formats, like PST, EML, MBOX, MSG, etc.
It has an intuitive GUI that streamlines the process for users to move their OLM file data effectively into their Gmail account. The toll also has a filter option to select only specific items to include or exclude from the importing or restoring process.
Quick Instructions to import OLM to Gmail
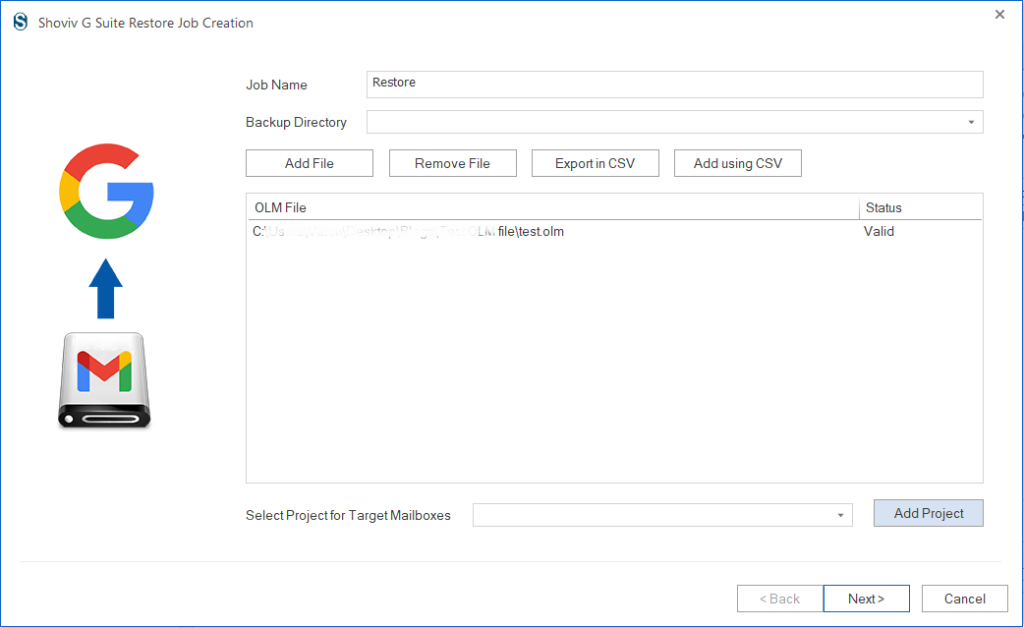
Open the Shoviv G Suite Backup and Restore Tool once it gets downloaded on your device.
Then, click the Mailbox Import/ Restore Jobs tab, select the Import OLM files option, and tap the OK button.
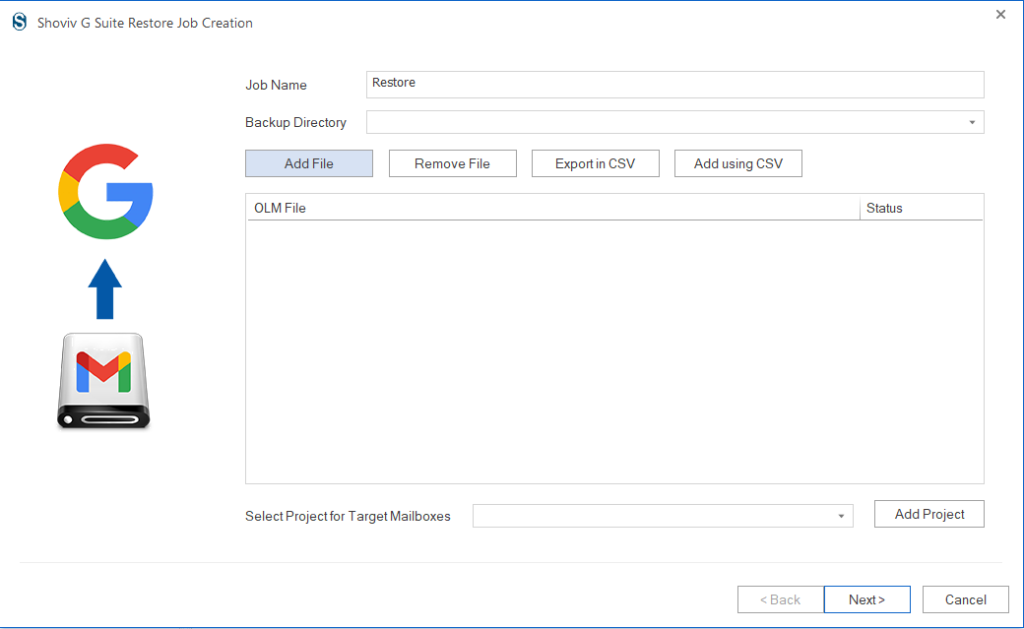
Enter the job name and click the Add File button to add the OLM files to the process.
After adding the OLM file, continue with the Add Project option.
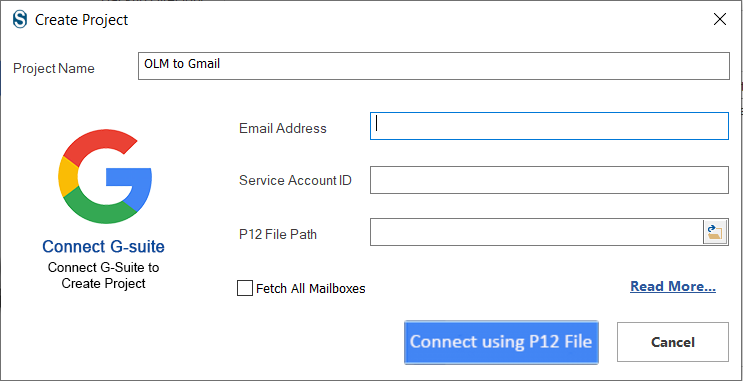
Then, provide the project name, email address, and other details. After filling in all the details, hit connect using the P12 File button.
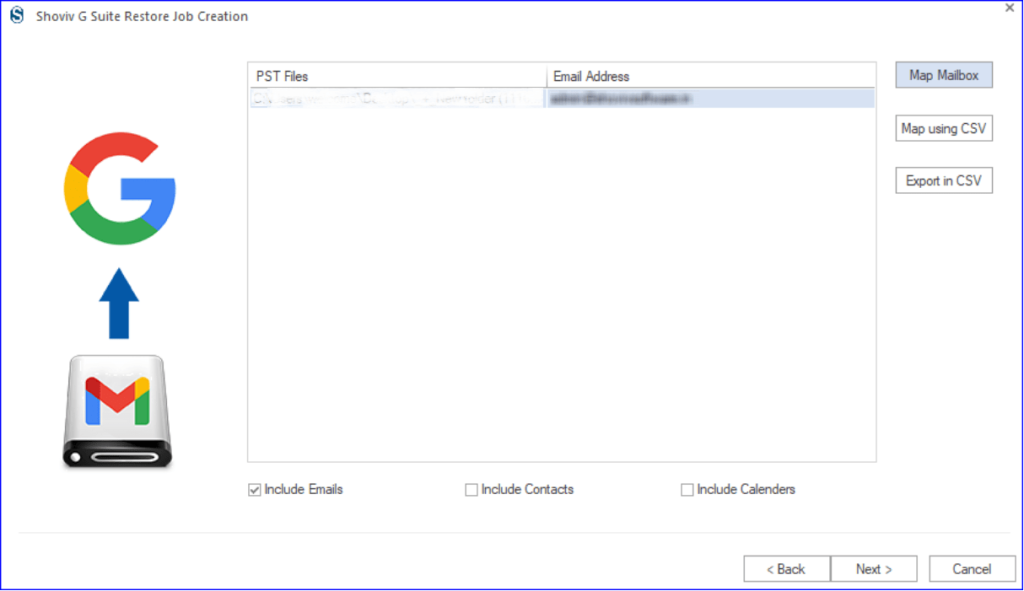
Now, map the source mailbox to the target and click Next.
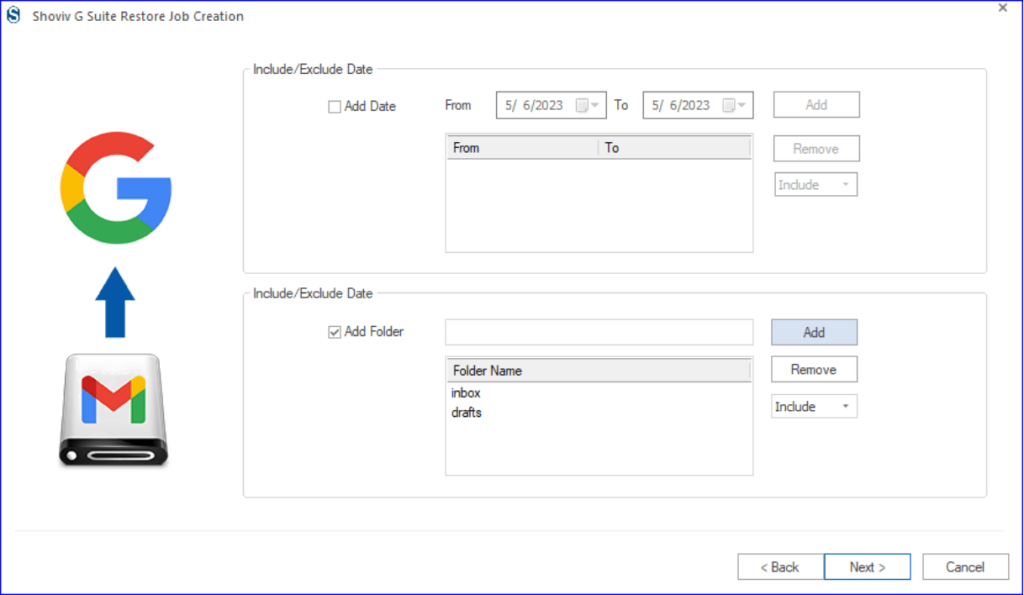
Filter by date or folder to include or exclude items during the OLM files importing task. Thereafter, tap the Next button.
Make changes per your preference on the Settings page. Also, check the Run Job Immediately checkbox to process OLM files just after creating the Job and click Next.
Tap the Finish button after following these steps to import OLM to Gmail business emails.
Ending Words
Users who want to switch from their Outlook for Mac to Google Workspace cloud platform can implement manual and professional solutions. The manual method has some common limitations, which can become significant if users have multiple and large-sized OLM files. Moreover, users need to technically advance to manually import OLM to Gmail business or Google Workspace.
Hence, users must use the Shoviv G Suite Backup and Restore tool to import OLM files to Google Workspace or G Suite seamlessly. It offers a simple user interface; any user can process OLM importing or restoring tasks. This tool also comes with a free test version, which users can use to process 50 items from each folder of the OLM files to Gmail business emails or G Suite.
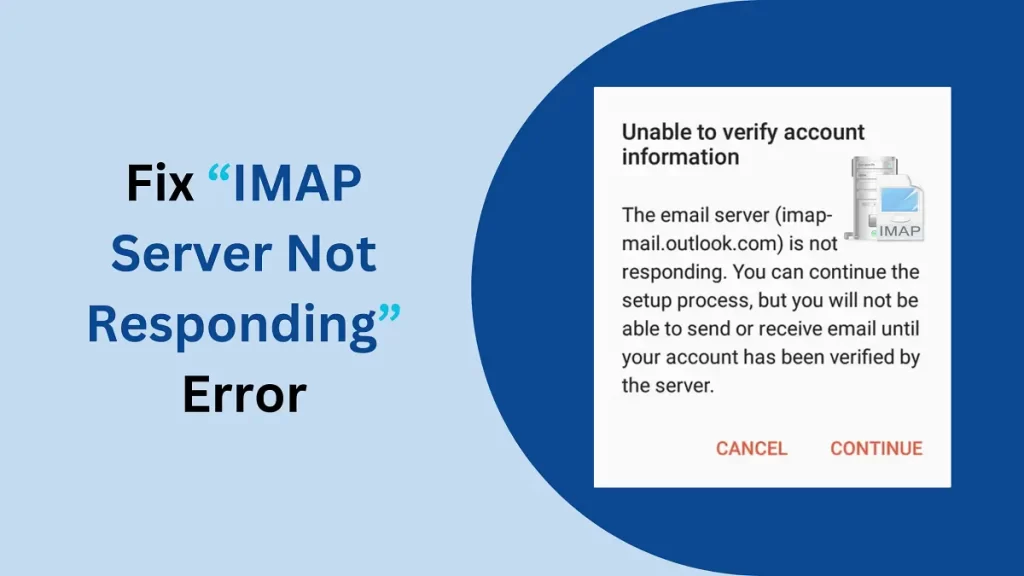
Are you experiencing issues with your IMAP email server not responding? If your IMAP server-based application is having trouble sending or receiving emails due to the IMAP server not responding error, don’t worry! This blog is for your queries; just scroll down and read the article.
IMAP (Internet Message Access Protocol) allows users to connect their email accounts, whether Gmail, Outlook, or Apple Mail, and check their email from any device, no matter where they are. Also, it lets you view emails directly from the server without downloading or storing them on your device.
Table of Content
Why It Happens?
It’s quite common to encounter the ‘IMAP Email Server Not Responding’ error. Accessing your email account or other tasks can be challenging when this error arises. For example- ‘As an email client, Outlook offers a remarkable experience. While it boasts various features, sometimes these functions break down and trigger errors like the ‘IMAP Server Not Responding Error’ message.
Also, sometimes IMAP-based accounts can run into issues that disrupt access and lock you out for various reasons. Let’s know the other reasons behind the errors and ways to fix these issues.
Reasons Behind the IMAP Server Not Responding Error:
Internet and Wi-Fi connections are not established.
Server issue/ temporary server unavailability.
Network or firewall issue.
The browser does not support that IMAP-based account.
Incompatible or faulty MS Outlook add-ins for Outlook.
Hardware or software-related issues.
Sometimes, you do not enter the credentials correctly.
Improper configuration of account.
Corrupt email profile.
Large .ost data file in Outlook.
SSL setting is not done properly.
The server or port number was entered incorrectly and has many more reasons.
Now that we’ve identified the common reasons for the error let’s explore solutions to fix it.
How Does IMAP Server Syncing Benefit Users?
Any changes you make to email, like replying, forwarding, or deleting, in your local mail client are synced directly with the IMAP server. Accessing your email from various devices ensures that your messages remain consistently up-to-date and in sync. Let’s discuss the benefits:
Syncing emails to an IMAP-based server safeguards valuable storage and ensures that local drives remain uncluttered and efficient.
With an IMAP-based server, you can effortlessly and securely retrieve your emails on any device or platform, guaranteeing a smooth and consistent email experience wherever you are.
Human errors are a natural part of life, cropping up in everything from daily chores and critical decisions to workplace tasks, with backup data systems standing by to cushion against these inevitable missteps.
When data is saved in the desired file format, users can access it offline, facilitating easy portability and the sharing and retrieving of their email information without server access and vice versa.
By backing a copy, you’re taking a wise step in shielding them from possible system failures and malicious threats.
What are the techniques for fixing the ‘IMAP Server Not Responding’ error?
Discover genuine and effective methods to resolve the ‘IMAP Server Not Responding’ issue using manual methods and professional solutions.
Manual Ways to Fix IMAP Server Not Responding Error
There are some popular methods to address the issue of IMAP not responding.
Method 1: Check the network connection
An IMAP email server often fails to respond due to unstable or slow internet connectivity. Suppose your IMAP email isn’t working properly. In that case, the first thing to do is verify that your internet connection is active before starting any other steps. To fix the network problem, try reconnecting the Wi-Fi or plugging the network cable back in.
Method 2: Verify the IMAP settings
If you’ve recently started seeing this error, review and adjust your IMAP server settings to ensure they’re correct. Follow the below steps:
Start MS Outlook, navigate to the File tab, select Info, then go to Account Settings, and Click the button.
Pick your IMAP email account and press the Update
Navigate to the More Settings menu and select the Outgoing Server
Check the box for ‘SMTP server requires authentication‘ if it’s not already selected, and then move on to the Advanced setting by clicking on it.
Verify the port numbers configured for the Incoming (IMAP) and Outgoing (IMAP)
To get the correct port numbers, reach out to the administrator. After entering the numbers, click OK to proceed.
Refresh your MS Outlook by restarting
Once you tweak the settings, the error should be gone. If it’s still there, try the following solution.
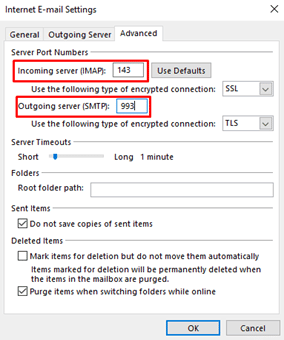
Method 3: Configuration of SSL Setting
SSL configuration in IMAP: To enable a secure connection with SSL, use these specific ports.
IMAP Port No – 993
Outgoing Server (SMTP) – 465
It will address the problem related to SSL setup.
Method 4: Recreate the OST File in the Case of Outlook
If the earlier suggestions prove ineffective in fixing the ‘IMAP Server Not Responding’ error, the root cause could be a malfunctioning OST file. To resolve this issue, consider reconstructing the OST file. Follow these steps:
In Outlook, head to the File menu for all versions, choose Info, then navigate to Account Settings and click ‘Account Setting’
Go to the Data file section and choose your IMAP email account from the list.
Find where the file is saved, then shut down
Create a backup of the existing OST by transferring it to an external drive and storing it in a different location or folder.
After completing the backup, delete the OST file from its default folder.
Give Outlook a fresh start by rebooting
Outlook will generate a fresh OST file and retrieve your emails from the IMAP server for syncing. If the problem stemmed from a mismatched OST file, resolving that inconsistency should correct the issue.
Method 5: Enable IMAP Setting on the Server
To avoid this issue in the future, it is vital to correctly configure your IMAP settings on the server. Follow these instructions carefully to carry out this method step-by-step.
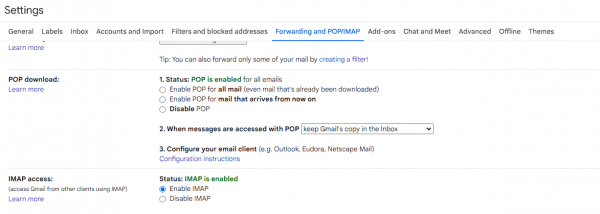
Head over to your Gmail account through a web browser.
Select the gear icon, then choose the ‘See all settings’
Go to the Forwarding and IMAP/POP tab and choose the Enable IMAP radio button.
Press ‘Save Changes’ to apply your updates.
Return to Outlook and configure or access your account using the IMAP settings. It should fix the issue.
If you’re using a different mail server, contact your administrator and have them switch on the IMAP setting from their end.
Method 6: Temporary Server Unavailability
IMAP relies on a continuous internet connection and an operational server to stay active and functional. While a fix for the Email Client-Server problem may not be at hand, having a backup of your emails ensures you’re protected against catastrophic scenarios, including when the IMAP Email Server fails to respond or goes offline.
Method 7: End the Running Application from the Background
When numerous background processes are running, they can bog the system and impede its performance. You can terminate these background processes by pressing the End Task button and following the instructions below.
Head over to the search bar of your existing interface.
Locate the Task Manager.
Choose the application you’d like to close.
Perform a right-click action on the application.
Pick the End Task button from the given list of selections.
Check if the IMAP server remains unresponsive; select an alternative expert solution if it does.
Method 8: Create a new profile
Sometimes, the account may be set up imperfectly. So, you need to create a new account. Starting fresh with a new profile might be the fix to resolve this error. To complete this task, you need to follow the steps outlined below.
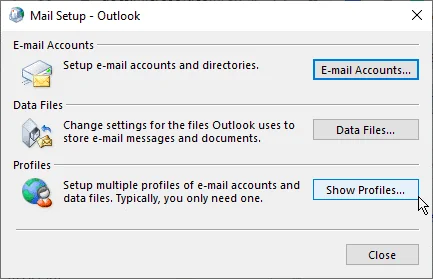
Access the Control Panel, navigate User Accounts, and select Mail.
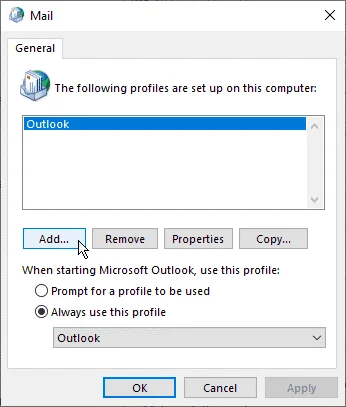
Tap on ‘Show Profiles,’ then select ‘Add‘ to create something new.
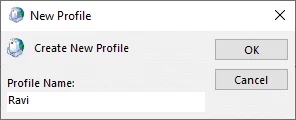
Create a new Profile name and hit OK.
Input your IMAP email credentials and proceed by selecting Next, then complete the setup by choosing Finish to configure your account within the new profile.
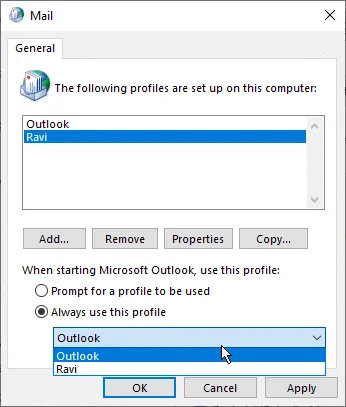
Return to the Mail window, select the option to ‘Always use this profile,’ and pick the Newly Created Profile from the dropdown menu.
Hit ‘OK‘ and then give MS Outlook a fresh start restarting
While these methods are quite simple, users can use them to see if the ‘IMAP Servers Not Responding’ error has been solved.
Why Don’t Professionals Prefer Manual Techniques?
As we know, manual methods come for free, but they also come with drawbacks and limitations. Many factors deter users from opting for manual approaches, and here are a few of them:
Manually backing up files can be tedious and lengthy, especially when you have a large data to handle.
There’s no certainty that your data is secure, and the potential for data loss exists.
Using the manual method to fix an unresponsive IMAP server email generally works for resolving only small, less significant errors.
With so many steps involved in the process, the likelihood of human error significantly increases.
The procedure is quite complex, and users without a technical background may struggle to carry out the backup process independently.
Whenever you encounter this error, feel free to choose from any suggested solutions. But, if you want a quick or reliable solution, saving time is your priority. There’s nothing better than going with a professional method.
Backup IMAP Emails to Deal with the “IMAP Server Not Responding Error”
IMAP is a popular protocol that powers many email clients, providing a robust and efficient way to manage messages. However, issues like the “IMAP Server Not Responding” error can sometimes arise from technical glitches and misconfigurations. To deal with this error, we recommend that a professional solution to backup emails is the smartest choice.
Shoviv IMAP Backup and Restore -Tool is a versatile utility designed to safeguard many IMAP-based email accounts, including Gmail, Outlook, Zoho Mail, Yahoo, Canary Mail, and more.
Robust Features of Shoviv IMAP Backup and Restore Tool:
Users can backup/export email data from any IMAP Server to PST, EML, MSG, and MBOX like popular file formats.
Moreover, streamline your data by importing/restoring OST, PST, MSG and MBOX files to your IMAP mailboxes.
It is developed to provide an easy and fast way for professionals as it allows creating multiple jobs, and in a single job, adding multiple mailboxes and processing them all together.
Users can apply filters as well as schedule the backup as per the need for the backup task.
Users also get free life technical support with the Shoviv IMAP Backup and Restore Tool.
A free demo version of this software is also available to download. The free demo allows processing the first fifty items per folder.
Closing Words:
The above-outlined article explained the reliable methods to Fix IMAP Server Not Responding Error’ manually or professionally. Also, explains the reasons behind this error. If the manual approaches don’t hit the mark for you or fall short of solving the problem, please skip them and explore other automated options. Simply follow the guidance of a professional tool and proceed with the recommended approach. Seamlessly back up your IMAP account into various formats in just a few easy processes without needing any tech expertise. Finally, try out its free demo version to learn how to work with Shoviv Software. To back up unlimited data, purchase a license key.
Do you want to upload MBOX to IMAP server and are looking for a one-stop solution? If yes is your answer, then this blog guide is for you. We’ll share some helpful tips and guidance to make importing MBOX files to an IMAP server a breeze. So whether you’re just starting or have been around for a while, this guide has all the essentials to help.
Table of Content
Overview of MBOX and IMAP:
MBOX is a file format many popular email clients use to store users’ profile data. It is compatible with a wide range of email clients, including Postbox, Thunderbird, Powermail, Turnpike, Mulberry, Apple Mail, Spicebird, Pocomail, Mozilla Mail, and many others. Backing emails as MBOX files makes keeping entire mail folders safe on your local system simple.
As we all know, IMAP (Internet Message Access Protocol) stands out as the most efficient protocol for email sending and receiving between the IMAP server and email client. Various email clients, including MS Outlook, Mac Mail, Netscape, Zimbra Seamonkey, and more, offer support for the IMAP protocol. When users want to receive and send emails from various devices, IMAP stands out as a favored protocol for its versatility and ease of access.
But have you ever considered the reasons why people choose to import MBOX to IMAP Server? Perhaps the features of IMAP-enabled email clients make the difference.
Why do users need to import MBOX to IMAP Server?
As webmail applications continue to rise in popularity, more users of desktop email clients are transitioning to IMAP-based webmail services. Importing MBOX files in an IMAP server brings many benefits, providing users with improved synchronization in their organization for their email communications. Let’s discuss more reasons for importing MBOX to IMAP.
Users are uploading emails using server-streamlined access, making it more straightforward for users to retrieve both incoming and outgoing messages.
MBOX files enable users to view their emails on specific devices using compatible email clients. Users of webmail accounts can check their email from different places simultaneously.
A webmail application allows users to manage their emails directly from a cloud server, providing the added benefit of backing data securely away from their local devices.
Uploading your emails to an IMAP Mail server is a wise choice to safeguard against possible system failures or malware threats.
With IMAP, users can securely check their emails from any device or platform. It ensures easy access and consistent email experience everywhere.
Automatically backing up emails to an IMAP server helps users free up valuable space on their local drives.
What are the methods of uploading MBOX to the IMAP Server?
Though importing MBOX files is an excellent way to create backups, there are instances when users need to import MBOX. Unfortunately, no manual techniques are available to upload your emails from MBOX to the IMAP server. To evaluate the user’s query, we tried our best to provide you with a manual procedure, but in the end, nothing was done. This procedure requires, after some manual steps, a third-party tool. Most people face issues while manually importing MBOX files to the IMAP server.
As no satisfactory manual method is available, we recommend using a professional tool to import MBOX to the IMAP server effortlessly. Let’s now look at an automated solution that simplifies the process, allowing you to upload MBOX to the IMAP server quickly and easily.
Professional Way to Import Emails from MBOX to IMAP Server:
To easily upload emails from MBOX to the IMAP server, try using the Shoviv MBOX to IMAP Import Tool, AKA Shoviv IMAP Backup and Restore Tool, for a quick and hassle-free solution. This software is ideal for users who upload their emails from MBOX to the IMAP server. Many tools struggle to maintain the authenticity of your email content but it preserves. With our intuitive software, you can simultaneously import files to your preferred IMAP Server.
If you have several MBOX files, you can use this software to import them all to your IMAP server simultaneously, ensuring no data is lost. The user-friendly graphical interface of this tool simplifies the process, making it accessible even for those without technical expertise.
This tool leverages advanced algorithms to offer clients innovative features, ensuring a smooth and secure email import process. Its intelligent design simplifies and safeguards the upload of emails, making the task more efficient and reliable. Let’s explore a few aspects of this incredible solution to become more acquainted with its capabilities.
Key Features of Shoviv MBOX to IMAP Import Tool
Supports uploading MBOX files and various other file formats, including PST, OST, EML, MSG, HTML, and MHT to IMAP Server.
Moreover, users can backup emails from the IMAP server to multiple file formats.
This tool allows users to seamlessly upload/ import a batch of MBOX to IMAP Server with a single action. You can create multiple jobs and in a single job, you can add multiple mailboxes and run them simultaneously.
Users get the filter facility, incremental export, and scheduler with this advanced tool.
This tool guarantees precise results by preserving the data’s integrity and the original folder structure throughout the import process.
You can preview each chosen MBOX file before completing the import, giving you a chance to inspect them one last time.
Whether you’re a tech-savvy or a complete novice, uploading MBOX emails to an IMAP server requires no specialized skills.
Whether you’re running Windows 11 or XP, this versatile utility is designed to function flawlessly on every version of Windows, including 10, 8, 8.1, and more.
Final Words:
This blog explained the best way to import your MBOX data into an IMAP server. Since no direct manual method is available, we advise using a professional tool to import MBOX files to the IMAP server effortlessly in bulk. Uploading emails from MBOX to IMAP-enabled Email clients can feel challenging, but having the right tool in hand makes the process much smoother. Thanks to its easy-to-use interface, beginners can also complete the import smoothly and without complications.
At the end of this blog, if you’re still unsure, try out the demo version of our software. The free trial provides the same functionality as the fully licensed version, so you can evaluate its performance before purchasing. It offers a comprehensive overview of how to import MBOX mailboxes to an IMAP account, allowing you to explore all its features before buying. However, it limits you to import only 50 items per folder. For the ability to upload an unlimited number of items in each folder, upgrade to the premium edition (licensed version) of the tool, designed to handle bulk MBOX to IMAP Server import effortlessly.
Frequently Asked Questions:
Q1. How can I upload MBOX files to the IMAP server in a fast and reliable way?
Ans. You can install the Shoviv IMAP Backup and Restore Tool and upload MBOX/PST/EML/MSG files to the IMAP Server professionally.
Q2. Is there any limitation on the size or number of the files that can be imported/restored?
Ans. No, there is no limit on the number or size; you can import multiple files simultaneously.
Q3. Can I use this tool on a Windows OS? Also, do they work on all versions of Windows?
Ans. Yes, this advanced edge-cutting tool is fully compatible with every version of Windows OS.
Q4. Does this professional tool preserve the integrity of my emails?
Ans. Of course, with this tool, you can maintain all original email headers, metadata properties, and other associated elements intact during the import.
OneDrive is among the top-rated storage facilities, which allows users to save their essential data on the cloud. It makes the accessibility flexible for users, as they can access their stored files & folders from any device, location, and time. This blog will list the solutions needed to save files from OneDrive to Local Drive with ease.
Let us start by understanding the reasons for this and how you can download OneDrive files to the local folder.
Table of Content
Why is there a need to download the files from the OneDrive account onto a PC?
Users can have lots of benefits for saving OneDrive files to local drive on the PC. Some of them are listed below:
After transferring the data/files from your OneDrive account into your system, you can access the data even without an internet connection. This is helpful when you don’t have access to the internet.
OneDrive has limited space for data storage, and users need to purchase additional space. To free up space in the OneDrive account, moving data from OneDrive to a local drive is one of the best solutions.
Taking down the data from the OneDrive account locally will act like backup copy which will be useful at the difficult times.
Now, you will be wondering about the solutions to download OneDrive to computer, and to do the task we have prepared a list of several useful solutions.
First, we will examine the manual solutions and recommend one that outclasses all the others solutions.
Solutions to Download the OneDrive Files to Computer/PC
Some OneDrive users do not aware about the solutions to download files from OneDrive to local drive, and if you are one of them then this article is for you as we will discuss about such methods.
However, this section contains the updated list of the solutions to download OneDrive files to the local storage on Windows PC.
Solution No.1 Manually Downloading data from OneDrive into a PC
The first method to help you download files from OneDrive to local drive requires users to download the files manually. With this method, you can download documents, excels, PowerPoints, photos, and even videos from OneDrive to your computer with easy steps.
Follow the steps to download the files from OneDrive:-
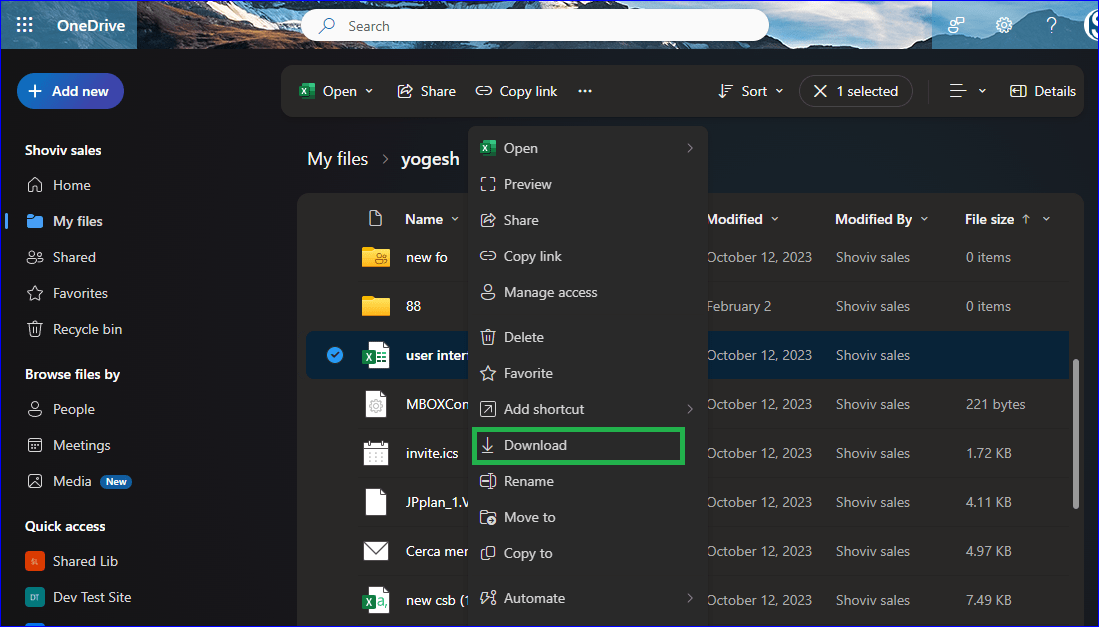
The first step in the backup process is to log in to the OneDrive account using the ID and password.
On the left of OneDrive, click on My Files. Select the files and folders you want to download.
Go to the download, which is available in the top menu.
Once the downloading is complete, you need to go to the location where you have the downloaded data.
Unzip the downloaded folder, which will include the requested data.
It’s Drawback:
Using this solution, one can download the data from OneDrive into PC except the OneNote file. Also, this method has a limitation that it can only allow users to download folders or files from the OneDrive root directory but not from the OneDrive root folders.
Solution No.2 Transfer OneDrive data Locally using Android App
The OneDrive application, available on the Play Store, makes it easier for users to save OneDrive files locally. To follow the same, you need to check out the steps shared below, which help you to save OneDrive files locally on your Android device.
Launch the OneDrive application on your Android device. Go to the location where the data/files you want to download locally are stored.
Click on the More button in the OneDrive app and then on Save next to the files you want to save locally.
Now, you can move the arrow to the location where you saved the files. Please choose a folder from the downloaded data and then hit the Save button.
After this, you can be able to access the OneDrive data in your android device.
Solution No.3 Download OneDrive data through the Account setting option
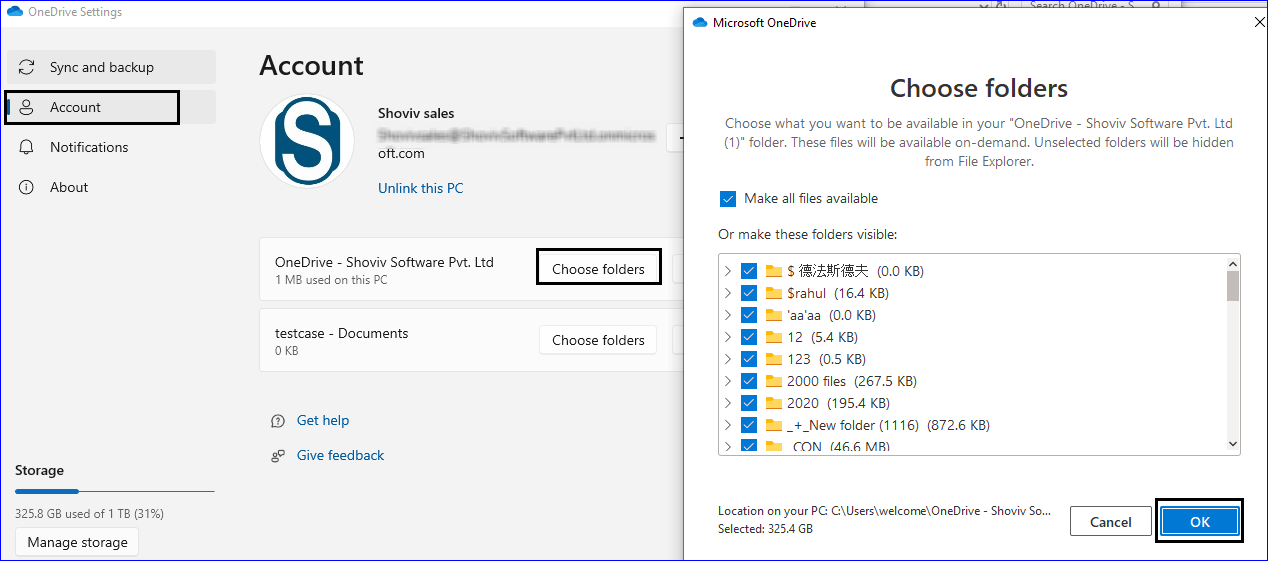
Again, you need to log in to OneDrive and click on the help & settings icon.
From the left side menu, kindly pick the Account and then click on the Choose folders.
Tick on the make all files available and then hit the ok button.
After performing the above stated procedure the data will start downloading into the system.
How to Download OneDrive Files/Data with the Use of Third-party Software
When you required to download OneDrive to computer with huge data, then you may face issue and struggle to complete the task. To resolve such issues and overcome the problems, you can consider the Shoviv OneDrive backup tool. This software comes with a highly intuitive user interface that will assist users in doing work quickly.
Apart from getting a higher data downloading speed, you will get bundles of helpful functionality. Like the software allows to filter the data before downloading them locally. Also, at the same time, users can also download OneDrive files to computer from multiple drives.
Some of the unique and advanced functionality of the tool
It allows users to download data from multiple OneDrive accounts at a single time.
The software has many helpful filter criteria, such as file extension, file size, etc.
Users can back up the data from their OneDrive account at different times using the backup scheduling option.
It allows the download of the complete data and will not restrict users from downloading any specific file type.
The tool allows users to create the job and run it at any time at their convenience.
Users will get technical assistance and resolution to their queries.
Step-by-step process to download files from OneDrive into Computer
The initial step for the users is to create a connection between OneDrive and the software.
Click on OneDrive to File System and then tap on the generate job from the dashboard.
Select the source project and the target folder, then click the next button.
After that, the filter option appears on the screen. Apply the filter according to your preference and click on next.
On the next page, users can use the job scheduling feature.
The software will now start downloading the requested OneDrive files into the system.
Wrapping Up
After exploring this article, which explains how to download from OneDrive, you may get a fair idea of the processes involved. As we have described in this article, there are several methods to perform the task, but all of them have pros and cons. However, after testing, we have concluded that the third-party software explained to you has the potential to outclass other solutions in many ways. We suggest that users use the software demo edition to download files from OneDrive to Local Drive to test their capabilities.
Frequently Asked Questions:
Q: How do I download files from OneDrive to my computer?
A: Quick Steps to download OneDrive files to the Local Drive/Personal Computer: 1. Install and open the Shoviv OneDrive Backup Tool. 2. Select the Source OneDrive and target folder. 3. Choose the Create Job option to create the backup project. 4. Then, apply the filters and modify other changes. 5. Click the Create Backup Job button to begin downloading from OneDrive.
Q: Can I download an entire folder from OneDrive to my PC?
Yes. You can use the Shoviv OneDrive Backup Tool (AKA Cloud Drive Migrator) to download an entire folder from OneDrive to your PC.
Q: What’s the fastest way to move files from OneDrive to my hard drive?
Shoviv OneDrive Backup Tool is the fastest way to move files from OneDrive to the hard drive. It also takes all files & folders at once from OneDrive to the local drive.
Q: Do OneDrive files automatically save to my local drive?
Yes. You can use Shoviv Software’s scheduler option to automate the OneDrive files backup and save them to the local drive.
Q: Is there a way to download files from OneDrive in bulk?
Yes, the Shoviv OneDrive Backup Tool is the best way to bulk download files from OneDrive to the desired local folder.
Q: Can I transfer OneDrive files to an external hard drive?
Yes. You can transfer OneDrive files to an external hard drive. You can also choose the desired folder on the hard drive using the Shoviv Cloud Drive Backup and Restore Tool (OneDrive Backup Tool).